WP Bridge

Configure GMAIL SMTP Settings For WordPress| A Complete Solution

The Missed Technicality

Do you want to send an email through WordPress but are failing to do so every time? Or, are your most critical emails landing into spam folder? This is because of a setting called Gmail SMTP – which if not configured properly can lead to the problems such as those above mentioned. 

The reason why WordPress doesn’t send your email is because your hosting server is not properly configured to utilize php mail functions. And, if it is configured, chances are upcoming emails will land into spam folders (which isn’t a good thing at all). So to help you land your all emails in inbox folder instead of spam folder securely, you’ll have to configure SMTP credentials of your hosting server in your WordPress admin area. Then, you will have to install WPMail SMTP Plugin for WordPress.

Gmail SMTP settings for WordPress are hard to do because of a few technicalities. And certainly, it is going to be a discouraging experience if you’re going to do it the hard way.
However it is not an impossible feat. In this article, we will guide you with a step-by-step process on how to configure Gmail SMTP settings for your WordPress website. 

We will start by giving a small but informative background on SMTP, the difficulties associated with configuring it in WordPress and then a guide on how you can do it.

What is SMTP?

SMTP is an acronym for Simple Mail Transfer Protocol.  Simply put, SMTP helps your message get across.  Think of it as an online one-way post office for all your mail deliveries. 

Yes, you read it right!!

What SMTP does is that it can easily send your email but doesn’t receive your emails. Technically, it is TCP/IP protocol for sending messages, but it doesn’t line up messages at the receiving end. The SMTP protocol follows the following procedure:

  • It is used for sending a message from an email client (e.g., Gmail) to an email server.
  • Then, the email server capitalises on SMTP (as a relay service) in order for an email to reach out to the receiving server.
  • In the end, the receiving server brings the email client into action for downloading incoming mail through IMAP and sending it into the recipient’s inbox.


It’s a bit on the heavier side, that is why it is difficult to correctly configure SMTP settings and that too in WordPress with Gmail as an email client. But why Gmail?

Why Gmail as an Email Client?

Although there are many SMTP protocols available apart from Gmail, for example, Amazon Workmail, GoDaddy, and Rackspace, the purpose of this article is to focus on Gmail as it is currently the widely used email client. 

Gmail being part of Google (always trying to make our lives easier) has a built-in SMTP support in it. It works on a ‘plug-and-play’ approach that means it can save money and time. 

However, if your website or you have to deal with a big volume of emails; you then must look at other options that I have mentioned  with flexibility, deliverability, and uncompromised security. We will try to cover the SMTP settings with other email clients in our upcoming blogs. But all that is for later.

Installing WP-Mail SMTP - The Quickest Way

First, a bit on the education side – why use WP-Mail SMTP? Why not any other or a simple  Since you are using WordPress for your website, using its own plugin is better. Other plugins tend to store unmasked passwords that might pose security threats.

Installing WP-Mail SMTP is simple. Follow the 3 steps below: 

  1. First, go the Plugins section and click ‘Add New’
  2. Then, go to the WordPress store, and look for WP Mail SMTP by WPForms.
    Once you find it, click ‘Install’
  3. After that, click Activate. 

There you go, WP-Mail SMTP is installed on your website. After this comes the other part – connecting to the Gmail Account. 

How to Connect your Gmail Account using WP Mail SMTP?

This next step is relatively linear and easy-to-do. Just put your gmail username & password, and a few SMTP server settings, and you’re good-to-go. At first, go to settings> WP Mail SMTP, and follow all the steps provided below:

1. From Email

Add your email account here because Google will match this email to your email account. So, it’s vitally important to put useful information in a folder of ‘From Email’
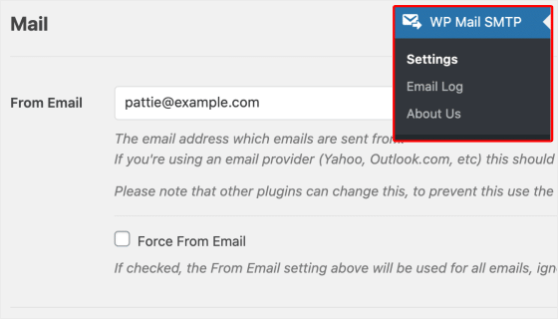
Email

2. From Name

‘From Name’, means all the names with emails you send out to people. It comes by default into your site. However, you can readjust to any value (as per your need) and the From Name can separately apply settings across the website.
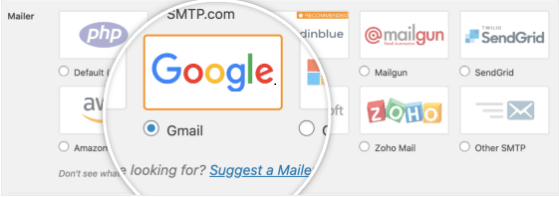
Name

2. Mailer

In this section, you’ll select a mailer for your WordPress website. In this blog, we’re picking ‘Google’ as our mailer, so now you will have to select the Gmail option.

Mailer

After you’ve completed this whole setup – click ‘Save’ and you’re good-to-go to send email with the help of SMTP. Once this is complete you will see the following section appear in your Gmail:

Mailer

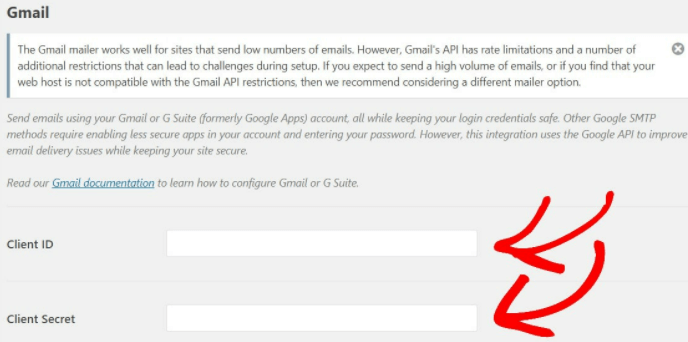
In order to gain information for the above fields, creating a web application using your Gmail account is a must. 

The good news is that the easy part is complete. The not so good part is that you will need to create this web application and that is what this next section is about. 

How to Create a Web Application in Gmail?

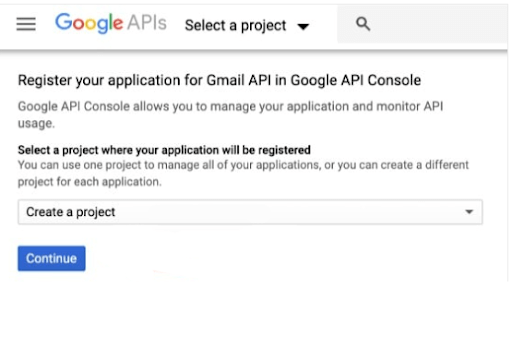
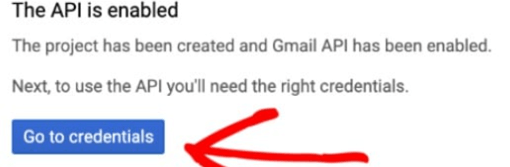
First, log in to your Gmail account and go to the application registration form of Gmail called ‘Register your application for Gmail API in Google API Console’. (Do keep your WP-Mail SMTP open as we will be discussing that too).

You will see the screen shown below. Just keep the default selection and then click ‘Continue’. 

hoot
The next screen that will appear will show you that the ‘API is Enabled’. Then as shown below just click on ‘Go to Credentials.’
credentials

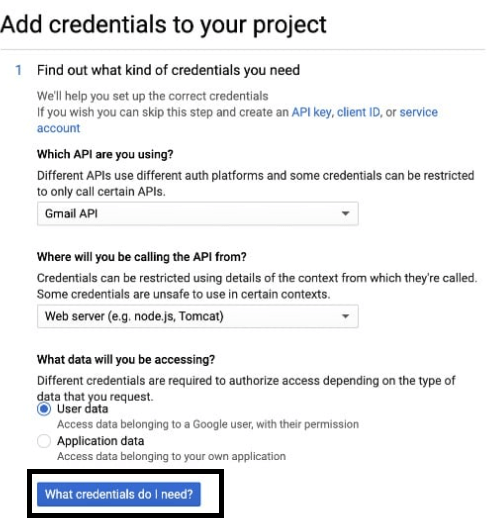
Once you get on the Credentials screen, select the relevant options as shown in the screen below. Once you do, click on the ‘What credentials do I need’ option.

credentials

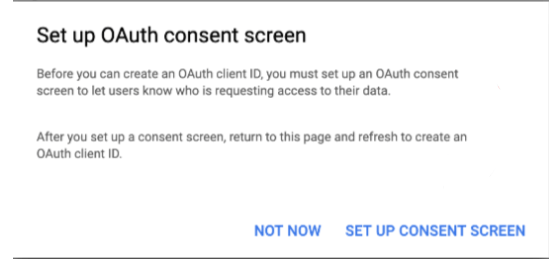
Next, you will be taken to a consent screen where you will have to set it up. This will open in a new window where you will be guided to set up the consent screen. (shown below):

credentials

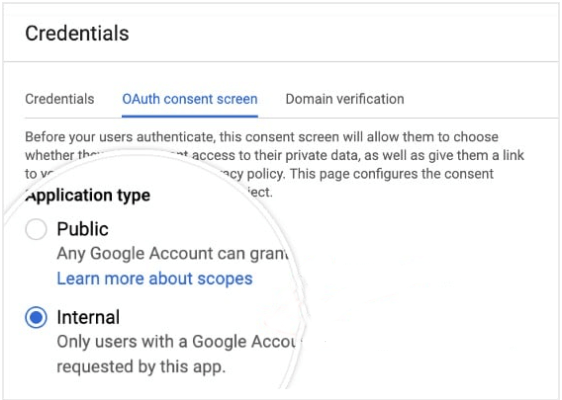
Once the screen opens, select the option ‘Internal’ since we are trying to restrict the access to the SMTP settings i.e. only selected users can use it. (see below):

credentials

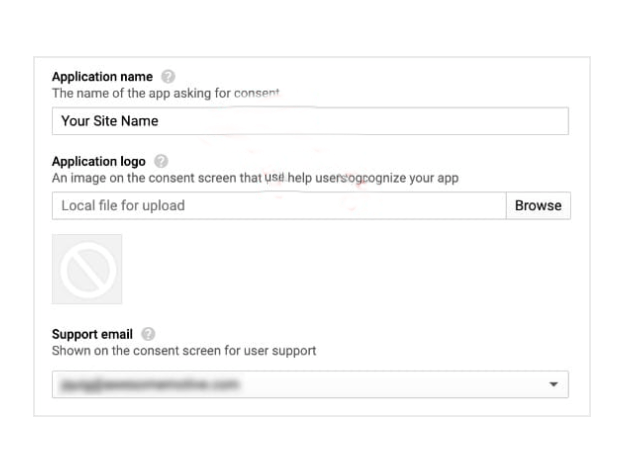
As you select the option above, the next screen that will pop up is to add the name and logo of the application i.e. your website (see below). Fill in all the relevant information and click ‘Save’. (if you need any help in filling out this form, just follow the picture as guidance or contact your WordPress Website Maintenance Company to help you out).

appliction
appliction

You are doing great up till now!!. But this is not the end — sorry..!! Few more steps and you will be done. Promise!!


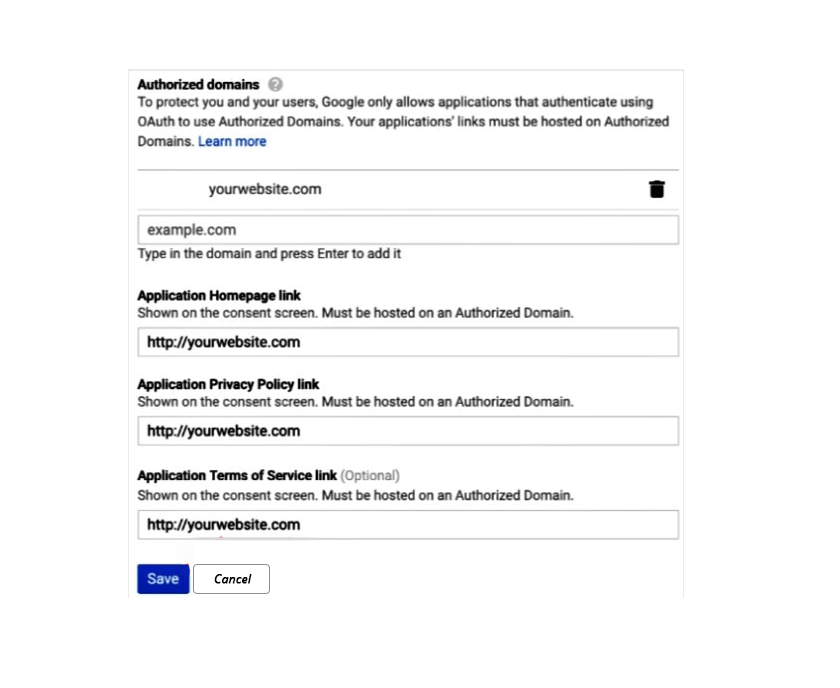
Once you save the applications consent page, you will be redirected to the API credentials screen. Here, you will have to make an OAuth client ID which will allow your website to authenticate the emails you receive via Gmail Account. 

First, in the Name field, you can use your real name or may opt to leave it as iIt’s all for referencing.

Then, you will use your website’s URL in Authorized JavaScript origins.

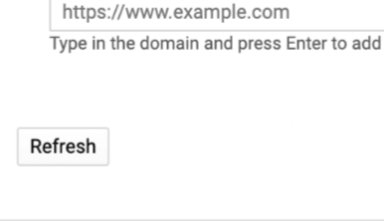
Lastly, you will have to fill the Authorized redirect URLs field. Go back to your WordPress’s tab and access Settings> WP Mail SMTP page, and now look for Authorized redirect URL under the Gmail section. You will have to put all the values in fields carefully followed by other details. You can copy these values by clicking on the copy icon (see below for reference):

return

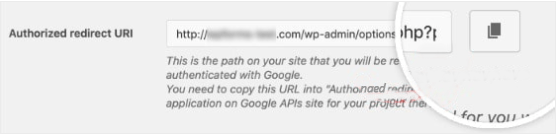
When you’ve copied the URI, you’ll return to the Google APIs and paste it immediately into the field below Authorized redirect URIs.

user

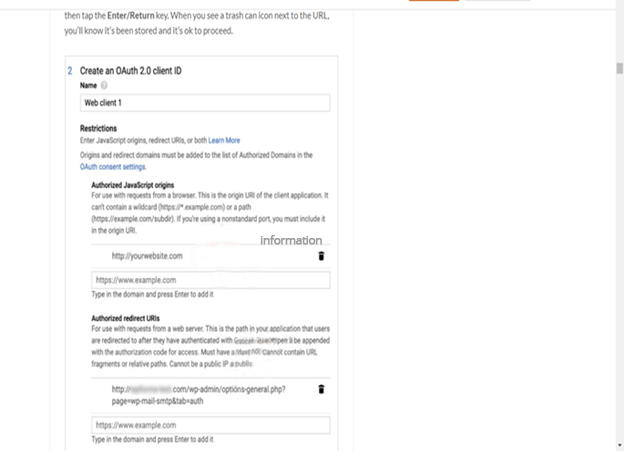
When you’ve filled in these details, you will see a ‘Refresh’ button near the bottom of your page that you will have to ‘Click’.

user

As soon as your Refresh everything, a new option will appear, ‘Create OAuth client ID’.

user

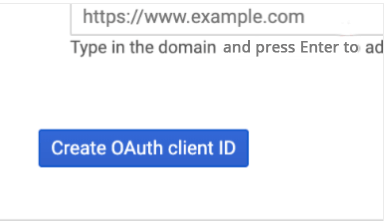
Congratulations!!!. Your Google Web App is now created.
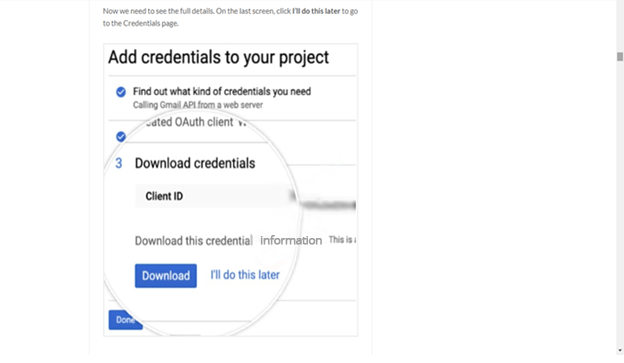
After you have successfully built a Google web app, you need to look for the full details and hit ‘I’ll do this later’ option (shown below) to reach out to the credentials page.

credintial

Though it was easy to set up WP Mail SMTP as you can read above, the requirement of Google in which you have to setup and configure the app in order to route the email using their SMTP servers which you just did was a bit difficult. But you did it. Hooray!!!!

Now to test it out.

How to Set WordPress Email Delivery with Google SMTP?

Once all is set, you will now be able to view the details that you entered in the Web App on your Credentials Page. . If you want to view ‘Client ID’ and ‘Client Secret’, click the pencil icon as shown in the screenshot below:

gogolesmtp

Now it will open all of the details of your application. Right on that page, you’ll find ‘Client ID’ and ‘Client Secret’ values like below:

applicationid

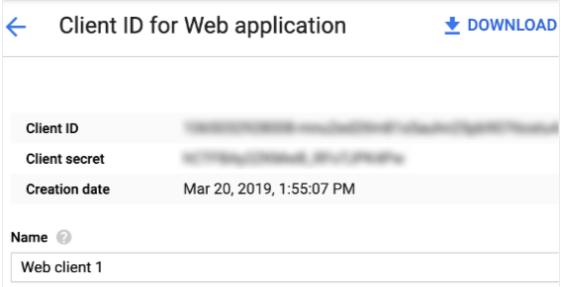
Copy these values into your WP Mail SMTP setting on your WordPress admin screen.

gmail

Once you save these settings, then you will have to refresh the page. Google will use this information for connecting you to your account. But first, you will have to grant Google permission to do so. In order to do this, you will have to scroll down to the bottom of a page, and hit ‘Allow plugin to send emails using your Google account’.

gmail

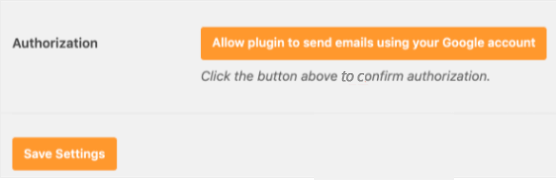
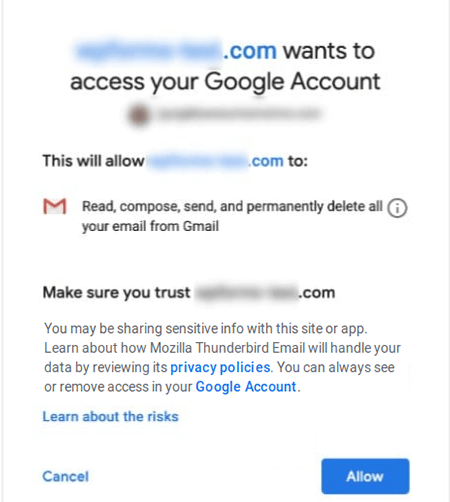
As soon as you click it, a login screen for Google will open. Just go ahead and log into the account that is registered with your SMTP. The next screen you will see is the request for permission where you will have to click ‘Allow’. (see below)

gmail

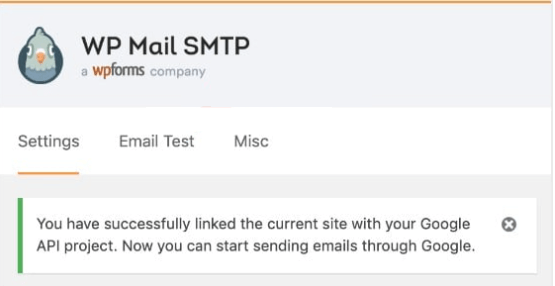
Return to WP Mail SMTP settings, and it will show a success message telling connection is complete and you can send a test email via Email Test tab.

mail

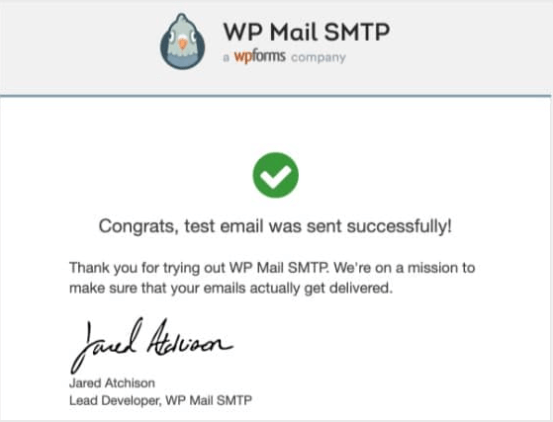
When you’ve opened the ‘Test Email Tab’, you have to put a valid email address and hit the ‘Send Email’ button. Only use that email address which you could use to confirm the test email when it reaches your inbox.

smtp

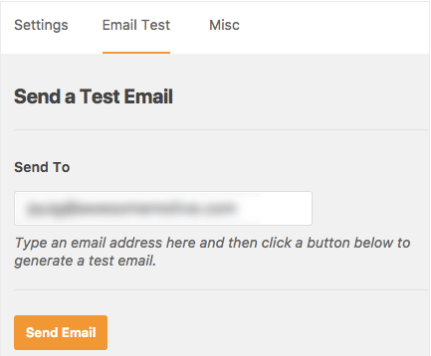
When you’ve sent the test message, it will display a success message at the top of your Window.

smtp

In the end, you’ll soon get a test mail at the email address you’ve used for this purpose especially.

smtp

WoooHoooo!!!! All Done!!! Time to wrap it up.

Wrapping up the Article

The goal of this article was to help you understand the ins and outs of Gmail SMTP settings for your WordPress website. In all honesty, you can see from the above guide, it is not the easiest method but we have tried to solve it for you in the easiest way possible. This will take 10 to 15 minutes of your time and will cost you nothing.

But, still if you think that such configuration is beyond your expertise, then contact us at  WP-Bridge. Our experts will be more than enthusiastic to not only set up the Gmail SMTP but also guide you so that you are able to do it on your own next time. 

Happy configuring!!

WordPress Website Monitoring 24/7?

Let us manage your WordPress site with top-notch security and high-end technical features– all-in-one-place.

Recent Blog

img
Posted by

WordPress powers 14.7% of the world’s top-sites which makes 63.5% of the total market share. Only in 2020, 500+ sites were built on WordPress, and 60-80 sites on Shopify( a huge difference!). Plus, WordPress has over 59000 plugins – these stats show us how impactful and user-friendly WordPress is.

In this article, we’re going to discuss key reasons that make WordPress ‘The Most Popular CMS’.

What Reasons Make WordPress “The Most Successful CMS”?

Following are ten reasons that make WordPress “the most successful CMS”. Go through them and enlighten yourselves:

Reason # 1: Ease of Implementing SEO Practices

WordPress is the most SEO-friendly CMS. Pick a catchy domain, use a responsive WordPress theme and organize your content effectively and boom ! you are good-to-go; boost engagement and win your marketing goals. Yes, It is this simple – no rocket science is required.

Unlike custom sites, you don’t have to spend extra-buck in development of a site. Neither, you will have to wait any longer before your site is actually complete. Likewise, prior knowledge and skills are not indispensable to move the needle. With WordPress, you can establish yourself as a most trusted service provider, ecommerce site or a blogging site, you are just a few actions away from becoming the next Huffington post.

This is ‘why WordPress is So Popular CMS’ because you can implement SEO strategies easily.

Reason # 2: Content Management - It’s A Cinch At WordPress!

Everything, which delivers a value, a message and a meaning, is Content. Whether you want to upload a video, a text content, an infographic, or just an audio podcast; you’re using the power of content to launch your brand or service or just promoting your well-groomed online identity.

It is by far the handiest CMS to manage your content to optimize engagement and SEO endeavors. Content is King which enables you to rule the world of internet marketing. And, WordPress is the right CMS to ease up content management for maximum output and ROI.

WordPress is very popular from enterprises and bloggers to big companies because they can manage their content and can prioritize SEO for maximum effects.

Reason # 3: It is FREE (Yes! And You will Love it )

The best thing about WordPress is that “it is free” and you can easily install WordPress core software on your site. Though WordPress is FREE, but, you will have to pay money for themes and plugins. Long story short, WordPress is a search engine-friendly CMS where you can create top-notch websites with engaging content.

Irrespective of niche, industry, and types of services, WordPress is the sweet-spot where you can design and build responsive websites at low-cost to save money for other aspects of your business.

Reason # 4: There is a Plugin For Everything - Amazing, isn’t it?

WordPress plugin is a software that plugs into your WordPress site to expand existing functionalities or add new ones. Plugins can make small changes to massive enhancements as per your requirements.

Likewise, you can use plugins for the front-end of your site as well as the back-end of your site to carry out the variety of tasks i.e., for taking backups, for putting WordPress site on a maintenance mode, for search engine optimization (Yoast SEO), and for responsive video and photo galleries (Envira Gallery),etc.

WordPress is a powerhouse of 59000 free plugins to enable you to optimize your site visibility, expand its features, and secure it from potential threats and cyber-criminals. No other CMS is this much equipped with handy plugins. Following is the little list of content management systems with the total number of plugins:

Hence it proves, WordPress dominates the CMS market with its big collection of 59000 plugins. Well, do you agree?

Reason # 5: WordPress is Open-Source - For Everyone. AND . Anyone

WordPress is an open-source CMS. Its source code is accessible and modifiable so that you could add and expand functionalities of your website. So, if you own a WordPress site, you can easily adapt to changes to adjust in existing trends to keep your site responsive and fully-functional.

Since WordPress is open-source, this CMS has a big community of WordPress contributors who bring forth pragmatic and innovative ideas to help WordPress grow significantly. (That’s why, WordPress dominates CMS market by 60.8%, it powers more than 15% of world’s top sites, and 500+ sites are built just on WordPress everyday – jaw-dropping stats, isn’t it)

Reason # 6: Want to Become a Blogger? Make WordPress Your Next Home

Initially, when WordPress started off its journey, it was purely a blogging platform. Over the years, it has expanded its usability so that you can use this best CMS for all types of websites from business sites ,membership sites, educational websites to Ecommerce stores, etc.

So, if you are an aspiring blogger who wants to reach out to a massive audience, make WordPress Your Next Home. It is an easily manageable, open-source CMS with a massive community of developers and contributors who work persistently to add innovation to WordPress. Still confused? Well, look at the following pointers expressing usefulness of WordPress as a blogging platform:

It is SEO-Friendly. You can optimize your visibility as a blogger across the internet to boost subscribers and connect your target audience at the right time.

WordPress is full-of-plugins for bloggers. It has a plugin for everything. It has OptinMonster for conversion optimization. It has PushEngage for web push notification. It has an Uncanny Automator for creating workflows automatically. It has Pretty Links Pro for monetizing your WordPres site content. Finally, you can get plugins literally for anything.

You can manage your content perfectly. Strategically, content is inevitable to steer your online presence towards the right direction. Like we said earlier, content is anything of value with message and meanings (videos, texts, infographics or just an image). WordPress is,certainly, a launching pad for bloggers where they make most of all types of content for gaining traffic, targeting the right audience, and generating qualified leads.

This is our reason number six – if you want to become a blogger, use WordPress. And, we believe it is helpful – isn’t it?

Reasons # 7: WordPress is the Right CMS For Enterprises

Previously, we highlighted a reason why you should use WordPress if you want to embrace ‘blogging’ as a career choice. Right now, we are going to see WordPress as “the right CMS for enterprises”. One-size-fits-all is a metaphorically correct expression for a WordPress: A content management system where building an e-commerce empire or profile website is as easy as ABC.

Following are the clear-cut examples of a reason “Why WordPress is Right CMS for Enterprises”:

  • elearning portals: elearning will grow globally to more than $240 Billion by 2022, 90% of businesses offer elearning training to their employees, and online education is expected to be a $374 billion industry by 2026. So, if you want to build your own e-learning platform, WordPress with LMS hosting is the right choice for you. You should use LifterLMS – a plugin for creating and marketing online courses including multimedia lessons.
  • Enterprises can use WordPress for creating Invoicing systems manager for products and services with Sliced Invoices. It is basic and you can use it with ease. This is one of the best plugins available in WordPress plugin repository.
  • Event management systems: You can set up an entire online system for event management. There are various plugins for event management. We would vote WP Event Manager because it is lightweight and open-source.

Reason # 8: Freedom. AND. Control in WordPress

Technically, WordPress is open-source. Therefore, there’s no limitation of flexibility and scalability. Especially, for ecommerce functionalities, you’re in a straitjacket at closed-source CMS. Likewise, your content is not even yours (unfortunately!)

Whereas, with WordPress, you have full freedom and control. You can move redundant files, build your online stores, incorporate plugins, or add a safe-and-secure WordPress theme for your site, you will have freedom and control in WordPress.

Reason # 9: Full Support for Almost All Media Formats

WordPress can support an extensive list of all media formats. Here, we’re covering primary media types and formats:

  • .mp3, .mp4, .m4a, .mov, .wmv, and .avi (Video and audio)
  • .pdf, .doc, .pptx (Documents)
  • .jpeg, .png (Images)
  • In fact, WordPress has file support for less common file formats such as .3pg, .ogg, .key, and .odt,etc.

Reason # 10: Massive Community Support (You won’t find it elsewhere!)

Since WordPress is an open-source CMS; anyone can optimize the source to scale up WordPress software enhancements and ease of developing secure, feature-packed and high-end themes and plugins.

Therefore, WordPress has solid community support of professional theme creators, plugin developers, and web hosting service providers, and professional WordPress maintenance service providers like WP-Bridge – which you won’t find elsewhere.

And, everybody co-exists with ONE MISSION: To Make WordPress Easy for Everybody.

Conclusion: Why WordPress has Become So Popular | Top Ten Reasons

WordPress is the most popular CMS where you can do anything. Build a blog or just run an Ecommerce store; you can do anything. Well, here are ten reasons that make WordPress such a popular CMS across the globe.

In nutshell, WordPress isn’t just a content management system, it is a launching pad to turn your ideas-on-paper into moonshots. If you have a WordPress site but can’t fix glitches yourself, don’t worry, we offer WordPress maintenance service and enjoy.

Permalinks
Posted by

Permalinks – A means to Enhance the WordPress website Performance

URLs are something that actually connects business owners with the target audience. Having a right and easy URL such as Google.com or Target.com not only enables the audience to remember the business and its URL but also can easily access its main page/homepage. In the world of WordPress, these URLs are known as permalinks. WordPress.com defines permalinks as:

“Permalinks are permanent URLs (Uniform Resource Locators) assigned to individual blog posts, pages, category and tag archive”

Linguistically, permalink is a portmanteau of Permanent and Hyperlink. It’s a URL that allows people to reach out to different parts of your WordPress site.

The importance of URLs or Permalinks (as we will be using both interchangeably throughout this article), cannot be overlooked. But unfortunately, it is overlooked when WordPress websites are created. When WordPress websites are created, developers or even the owners do not pay a lot of attention while creating them because it is considered to be an unnecessary item. However, that is not the case. Permalinks are highly important when it comes to SEO and performance optimization of the WordPress website (will be discussing this in detail in the next sections).

A long, lengthy, or even a faulty permalink can affect the overall performance of the WordPress website and the SEO efforts. All-in-all, a well-defined permalink works as a clue for a search site and ensures that whether your content is search-friendly or not.

Therefore, in this article, we will be focusing on changing permalinks in order to make them optimized for the best WordPress performance.

But, first, as always, a little education on Permalinks is important!!

What does a Structure of WordPress Permalinks look like?

Basically, a permalink comes into two parts:

  1. First is the domain name of a website ( i.e., wp-bridge.com)
  2. Second is the slug: a URL-friendly name describing the content that user is going to find on the page (i.e., /contact-us)

Why are Permalinks So Important?

Permalinks have significant importance for WordPress sites as they have a direct impact on things such as SEO, user experience, and website navigation, etc. Some of these aspects are discussed below:

  • User Experience: One of the things which makes the user experience of a website better is ‘URL’. Often, UX design is considered essential for all the stuff lying below the browser tabs, but holistically, the full user experience is not limited just to it. Technically, what you’ve included or have not included in your permalinks mark a big impact on whether a visitor can land on the correct page or will bounce back. For example, users look at the title and URLs of the site. So, they only pick those URLs which seem relevant. That’s why permalinks boost the UX of a WordPress site.
  • Effect on SEO: “No visibility is no business” – No brand can successfully exist in today’s super-digitalized business ecosystem without an identifiable presence across search engines. And, this online visibility is bound to happen when you have a good SEO strategy in which ‘permalinks’ play an important role. In broader context, a SEO builds domain authority through the use of right keywords, and if those keywords are integrated objectively in permalinks, they are a surefire solution to boost your SEO rankings to pull search engine traffic to your WordPress site.
  • Website Navigation: Permalinks enhance website navigation as they help users figure out the location of a content on the website. Permalinks make it easy for netizens to return back to their favorite post later and they can share the post with everyone else. Contextually, URLs help identify and organize content. It is the responsibility of the front-end to create user-friendly permalinks so that a visitor could get an idea of website structure for finding relevant content on your WordPress site.

When should you Reset or Change Permalinks?

From a technical standpoint, changing WordPress permalinks can badly affect SEO endeavors as it might impair link building efforts used for funnel-building to drive web traffic to your WordPress site that kills off lead-generation efforts. There are a few things you need to do to resolve these issues even after resetting permalinks in WordPress.

Here are some of the instances, when changing permalinks can prove useful:

  1. Possibly your existing posts have a page structure that’s not user-friendly. For instance, the old version of your WordPress post contains a Post ID which is not helpful for people to remember and they can’t use for reference for later use.
  2. An existing post consists of a worthless permalink structure with no SEO benefit.
  3. When you’ve rebranded your site and want your URLs to showcase your rebranding efforts.

What are the Easy and Safe Steps to Change WordPress Permalinks Without Breaking the Site?

To change permalinks in WordPress without breaking the site is not without difficulty. In order to change the permalinks without breaking the WordPress website, you should take the following easy and safe steps for changing WordPress permalinks correctly:

1. Backup your WordPress website

In order to change the permalinks, first take a backup of the page or if you have time – the whole website so that in case if a link does not work, you can revert back to original settings.

2. Change your permalinks

In order to change the multiple permalinks of your contents, just go to the WordPress dashboard where you can update the permalink structure. This action should produce two outputs:

  • It should change the permalinks of already existing pages and posts in WordPress.
  • It should change the custom URL structure to ease up storing content in future with relevant permalink format.

3. Redirect the website

Once you change the permalinks, users will see a WordPress 404 error. Therefore, in order to prevent users from bouncing off your site due to unavailability of content, set up redirects. Specifically, use HTTP 301.

Moreover, old indexed posts with old URLs get broken when permalinks are changed. Therefore, everybody with an old link would see – HTTP 404 Page Not Found – an error message, that’s very irritating.

Here, you can do two following things to redirect:

  • Add the redirects manually to your WordPress site’s .htaccess file by using the following format for quick and easy redirection:
				
					Redirect 301 /your-former-post-url.html /your-new-post-url.html
				
			
  • Get a WordPress maintenance service from experts who will not only enable redirection to the file but also help you in the quick-fixes of other technical problems.

Final Words - Easy Ways of Changing Permalinks in WordPress in 2022 (without breaking up your site)

Permalinks are indispensable for WordPress sites due to a variety of factors that we’ve talked about comprehensively here – and we helped you understand how changing permalinks can harm your WordPress site as this process is fraught with peril. Even a slight mistake can damage the whole site leaving you agitated.

Or, you can have experts at WP-Bridge to handle everything for your website and make your site optimized and well-structured.

WordPress
Posted by

It’s a laborious task to create, manage and maintain a website but it can be made easy – from managing to maintenance – if you know your way around the hosting account control panel. Given the increase in usage of WordPress as a website builder platform, cPanel in WordPress has become quite popular.

Since cPanel is a popular web hosting control dashboard, certainly, there is an option of using it. It is user-friendly, intuitive and comes with all nuts and bolts for configuring your WordPress site.

In this article, you will walk through 7 effective and helpful tips to enable you to install, access and configure your WordPress site easily.

What are the Seven cPanel for WordPress Tips?

Following are the seven best cPanel for WordPress tips covering everything from installation and access to configuring. They are well-explained and highly useful to make it easy for you to use cPanel for WordPress:

Tip #1: How to Access your cPanel Dashboard?

Before we dive into details, let’s learn how to find your WordPress cPanel login screen. This process depends upon your hosting service provider.

First, log into your hosting account and check for a link or button saying you to ‘log in to cPanel’:

dashboard

Once you click the button, you’ll land on the cPanel dashboard now.

If you do not see this option, then open your preferred browser, enter your domain name followed by 2083 (for example, https:// example.com:2083) and it will show you cPanel login page:

cpanel

At this step, ask for cPanel credentials from your hosting provider and login.

Key Thing to Remember: You should have an SSL certificate installed on your WordPress site to access cPanel in this way.

Now that you have access to your cPanel account, it is time to get on the next step.

Tip # 2: What is the right way to Install WordPress in cPanel?

WordPress users can install Content Management System (CMS) without needing to upload files manually – a very useful feature for WordPress users.

To begin with, you need to log into your cPanel dashboard. Once you have access, browse the Apps section and select ‘Softaculous Apps Installer’. In this step, you’ll see a screen full of apps, from the list of available apps, select ‘WordPress’ right away:

dashboard

Right on the next screen, click on ‘Install’ and then pick a ‘one-click’ or custom option. Here, you’ll have to select a domain for installation of WordPress. We will use ‘subdomain’ for this purpose.

You will see Softaculous (App Installer) showing the WordPress admin and password automatically at the bottom of the screen. Now, enter your email address in the email installation details.

Now, the installer will begin loading. It might take a little time to finish off the process. Upon completion, you will see the screen provided below:

dashboard

The message comes with login information with a link to the WordPress login page. You will get all details sent to the provided email address.

How to Install WordPress in cPanel Manually?

Unfortunately, if you don’t have a one-click WordPress installation option provided by your hosting provider, you can install it yourself manually via cPanel which will take hardly five minutes to install, saving you from the extra tediousness of connecting your server via an FTP client remotely.

The first step here is to create a WordPress database. Log into your cPanel account to do so and click on MySQL Database Wizard under the database section:

dashboard

Enter the name of your new database and click on the Next Step button. In the screen showing ‘Create Database Users’,put a username and password, and click on ‘Create User’:

dashboard

At this point, you’ll be asked to assign privileges to the database. For this, click on Next Step > Return Home. In case, if you haven’t already, you should navigate to the WordPress site and download the latest version.

Now, return to cPanel, navigate to File Manager present under the Files section:

dashboard

When you’ve launched the File Manager, look for the public_html directory. Now, click on the Upload button and start uploading the WordPress.zip file:

dashboard

Click on the ‘Go back’ button once loading is over. Here, select the WordPress files along with Extract.

After the files have moved to the public_html directory, visit your domain in the browser. A WordPress welcome message appears, following the installation prompts to begin setting up your WordPress site.

Tip # 3: What is the Way to Access your WordPress Admin Dashboard from cPanel?

After finishing WordPress installation, you can access your admin dashboard from cPanel. A quick and easy way to do this is to click on the link that was sent to your email when you installed the CMS. Also, don’t forget to click on the administration URL link provided in cPanel.

Right after clicking on the link, you’ll be redirected to the setup page. Here, you will see guidance for new users:

dashboard

Tip # 4: How can You Use the cPanel File Manager?

File manager is a handy feature in cPanel. From accessing your WordPress sites’ files for critical editing to resolving technical glitches, you can do anything comfortably. Following are a few examples:

  1. When you have to create a child theme, or when you have to implement WordPress multisite.
  2. You can troubleshoot errors preventing you from accessing WordPress dashboard
  3. Upload or remove themes and plugins manually
  4. When you have to incorporate custom code or have to turn on debug mode.

File manager interface has a user-friendly interface where you don’t need an extra set of login credentials. Take a look at the image below telling you how to access the cPanel file manager – Files > File Manager:

dashboard

It will take you to a list of all files uploaded to your server through a hosting account. For accessing your WordPress files, search for public_html folder:

dashboard

You can upload, delete, edit and download your website files for creating backup, managing file permissions and using more options:

dashboard

Tip # 5: Open phpMyAdmin from cPanel

A WordPress site also contains a database in addition to WordPress files. A WordPress website owner can edit information stores in the database to solve errors, add/remove user(s) from a WordPress site, or even enable you to reset lost WordPress password.

Here, you’ll have to go phpMyAdmin: a database management tool used to communicate data from your site and successfully finish any of the tasks. A way to access comes via cPanel by Databases > phpMyAdmin

cpanel

When you’ve opened phpMyAdmin, find your database in the list on the left side and view its tables by expanding it:

cpanel

You should be able to apply relevant instructions to solve errors or you may edit the changes.

Tip # 6: Change your WordPress Password from cPanel

In case, if you have lost your WordPress password, you can use phpMyAdmin from cPanel to change your WordPress password. To do this, access phpMyAdmin from cPanel, go to the database of a website, edit the users. Now, in a few more clicks, you can comfortably reset the encrypted passwords for users.

Tip # 7: What is the correct way to uninstall WordPress from cPanel?

Let’s say, you want to launch a new website or want to get rid of WordPress installation, you can do anything via cPanel easily and in a record time. Well, before doing anything, you’ll have to build a backup first for future use. After you’ve made a backup of your WordPress site, log in to your cPanel account in the next step. At this stage, open your File Manager and look into the public_html directory where you could select and delete WordPress files.

Now comes the time to delete your database. For doing this, click on MySQL Databases under the Databases section of cPanel dashboard. And, finally, select and delete the WordPress database. WordPress no longer exists.

Final Words - 7 Effective Tips for cPanel for WordPress

Mo website owner can deny the fact, ‘a web hosting control panel by a hosting provider has to play a crucial role in managing a WordPress site. Therefore, it is super-important to be familiar with how to use cPanel for WordPress. That’s why, we talked about cPanel and its uses at length throughout the article.

If you feel this is too confusing or complicated, just reach out to us at WP-Bridge, and our experts will take care of everything.

Tired of a Slow Loading Website? Want to Make WordPress website Load Faster?

WP Bridge uses cookies and similar technologies as strictly necessary to make our site work. We and our partners would also like to set additional cookies to analyze your use of our site, to personalize and enhance your visit to our site and to show you more relevant content and advertising. For more information, please read our Privacy Statement.

Website Audit Form

We’re looking forward to providing ongoing support for your website! Please fill out the form below for website audit report.
This is the website URL for your monthly maintenance package.