
Let’s suppose you changed the URL of your WordPress website page or even a small post. The result should be the changes you wanted but instead you find yourself looking at the ‘404 error’ on your webpage. All the efforts that went to generate traffic, and backlinks are no more just because of a simple change of URL.
What you just experienced is something that many people go through – even the technical ones – on a daily basis when they try to change URLs of certain pages or posts. The solution to this error is easy but technical. It calls for applying redirects to before making the changes so that if someone tries to access a certain page or post and the new URL is not accessible, it redirects the user to the old URL. One of the most commonly used redirects in this respect is ‘301 Redirect.’
In this article, we will be technically guiding you through the process of applying 301 redirect via .htaccess as well as plugin. But first, like always, a brief introduction to the 301 redirect and where you might use it needs to be known so that you know exactly what you are dealing with and why it is necessary.
301 Redirect - What is it?
Given that WordPress website is an open source platform for developing and designing websites, it is not without flaws. Many errors are faced by users on a regular basis for which different solutions and patches are available. One such error ‘404 error’ is resolved by using ‘301 redirect’. So what is this redirect all about?
It informs search engine robots about the permanent movement of the page(s) or even post(s). In fact, it might not be of value for humans to be aware of this permanent change but it is far much essential for search engines to know because it has a key part to play when it comes to visibility of the website. Therefore, 301 redirect works to indicate search engines so that they could replace the old page with the new page at the ranking position held by the old page.
Simple and logical – isn’t it.
Moving on to its uses…
Using 301 Redirect with your WordPress website
There are various situations in which an average WordPress user is more likely to opt for 301 redirects. Some of them are:
a. Domain name – If you want to change a domain name without tweaking the available content, you’ll have to apply the 301 redirect to take your old WordPress website to the new one with ease.
b. URL of a single post/page – To change the URL of a post/page, you will have to add a 301 redirect in order to redirect any internal/external links so that your website visitors could be taken to a new URL instead of the old one.
c. Consolidation of multiple posts into a single one – This is really helpful when you have four different posts on the same topic. You can consolidate all those four posts into a single one. You can choose to apply 301 redirects to all of your four posts into a single and improved version.
As you can read above, using 301 redirect is basically useful for all URL related matters. Now comes the technical part – applying the 301 Redirect. In this article, we will discuss two methods that you can use to apply 301 redirect. These are:
- Via .htaccess
- Plugin
Let’s look at ‘how can you add a 301 redirect to your WordPress website with .htaccess’ in detail first.
How can you add a 301 Redirect to your WordPress Website with .htaccess?
The .htaccess is a short form of ‘hypertext access’: a distributed server configuration file. This file enables you to tweak server configurations for a specific directory. This can be the root directory for your website, image or downloads. So, basically, a .htaccess file works as a configuration file for a web hosting server. Therefore, let’s see how can you add 301 redirects with the help of .htaccess in three easy steps:
- Locate and download the .htaccess file of your website( through FTP Program)
- Don’t Forget to Back your .htaccess File
- Add redirects and upload new version of your .htaccess file
Step #1: Locate and Download .htaccess File of your website
You can locate the .htaccess file of your WordPress file by connecting to your web server through an FTP program. If you’re not able to do so, don’t fret about contacting your hosting service provider.
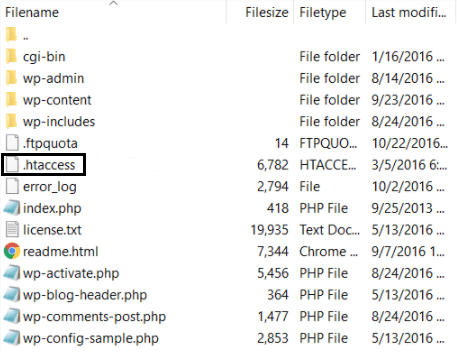
Your .htaccess file would be in the root folder of your WordPress website. It will be in the same folder which has files such as wp-config.php along with folders like wp-content, etc. And, it will look like this to you:
Once you’ve located that file, download it on your computer right away.
Step #2: Don’t Forget to Back your .htaccess File
This step is mission-critical for adding 301 redirects to your WordPress website. As mentioned earlier, .htaccess is the configuration file for web servers. So, you can risk harming your website as it can take organic traffic off your website and might damage your reputation as an online business. Therefore, it is inevitable that you make a copy of the .htaccess file that you’ve already downloaded from your site and assure that your original safe is safe and unedited.
Step #3: Put 301 Redirects to your .htaccess File
When you’ve created a copy of your original file, you’re good-to-add redirects to your WordPress website. Start off by opening NotePad and check on the box that says – Always use this app to open .htaccess files.

You will see something like this while using permalinks:
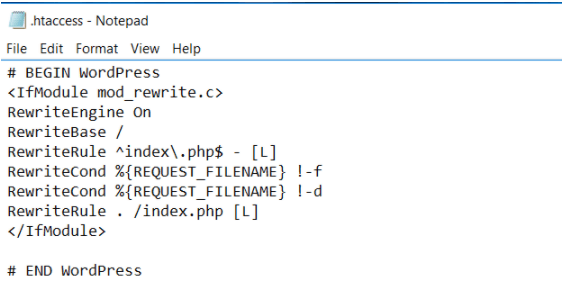
In order to add redirects, you will have to add the relevant code to the .htaccess file. In order to make this simple, we have shared an example with you below:
Add the following short snippet for post or page, you’re intending to redirect:
Redirect 301 /old-url https://yourdomain.com/new-url
If you want to apply 301 redirect to a post ‘www.abc.com/301-post’ into ‘www.abc.com/how-to-redirect”, then add the following code:
Redirect 301 /301-post https://abc.com/how-to-redirect
Similarly, you can easily redirect your complete site to a new domain using this code:
					RewriteEngine on
RewriteCond %{HTTP_HOST} ^olddomain.com [NC,OR]
RewriteCond %{HTTP_HOST} ^www.olddomain.com [NC]
RewriteRule ^(.*)$ https://newdomain.com/$1 [L,R=301,NC]
Important things to note:
- old domain name stands for original domain name
- new domain name stands for new domain name.
- This redirect will save link structure, therefore, a visitor will be redirected to “newdomain.com/about” when he/she will visit “olddomain.com/about”
That’s how you add 301 redirect using .htaccess. If you’re not a tech geek, or you don’t want to spend time dealing with technicalities, then use a simple, easy-to-use, and free plugin known as ‘Simple 301 Redirects’. Let’s see how in the next part.
How to Add 301 Redirects to WordPress Website using Simple 301 Redirect Plugin?
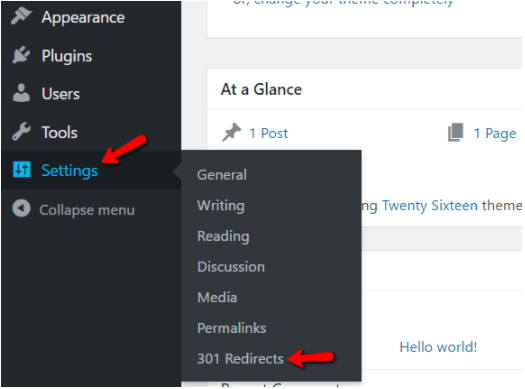
Comparatively, using a plugin involves less time, energy and resources to apply a 301 redirect to your WordPress website. The process of using and installing the Simple 301 Redirect plugin is the same as all the WordPress plugins.
Install the plugin and activate it immediately. Go to Settings and then come down to 301 Redirects, where you will be able to access your new redirect panel:
You can redirect a single page or post by entering the ‘end part’ of the original URL and full URL on the right side of the screen. (Check the below image for more clarity)
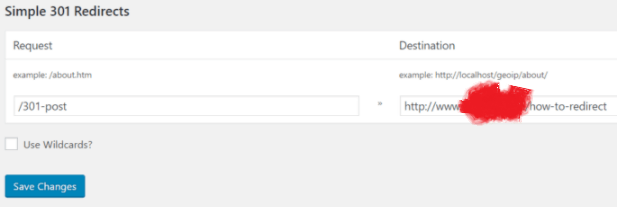
Or, if you want to redirect your all posts/pages to any external domain, put an external URL in the Destination box for this purpose. And, you will have to tick ‘Use Wildcards’ options – if you want to avail more advanced options.
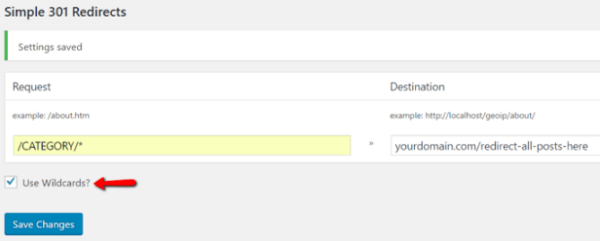
(*) after a CATEGORY is a placeholder that will display every text following the word ‘category’.
And that’s it. Your redirect will be applied immediately.
In the End…..
The most important thing to remember is that whenever you are making changes to your existing website, no matter how small, you should know that anything can go wrong and you need to be prepared for it. For instance, making a change to URL to another URL sounds simple but can lead to 404 error which in turn leads to lost leads, website ranking and much more.
In this article we discussed why 301 redirects are important for your WordPress website especially when it comes to changing domain names and URLs. We taught you 2 methods using which you can apply 301 redirects to your website – the .htaccess and the plugins.
If you ever feel that you need assistance in any matter of your WordPress website, it is not a bad thing to ask. Especially when our experts are there to assist you 24x7 with no strings attached.