WP Bridge

How to Fix ‘Your Connection is not Private’ Error in Chrome (WordPress)?

WordPress is no stranger to errors that hinder the performance of business or personal websites. However, there are many errors that are not the fault of WordPress itself but rather the owners of the websites who fail to maintain their WordPress websites as per the standard WordPress guidelines.

One such fault or error that might be constantly visible on websites is “your connection is not private”. This error is particularly visible in Google Chrome because of certain security protocols set by Google Chrome to inform its users of suspicious websites that can be a cause of security concern.

Why is ‘your connection is not private’ error important?

Before we get ourselves ahead in this discussion, getting to know this error will help in understanding its importance.

Websites in large numbers use insecure HTTP (Hypertext Transfer Protocol) that works to fetch data from a web server to be shown on the search engine. This data while getting transferred from a server to the browser may not always be secure making it vulnerable to hacking. Out of hundreds of technical flaws that may happen to worsen cyber security and reputation of a business digitally, “Your connection is not private” is the error message that disappoints the website visitors the most. In fact, it happens when Google Chrome doesn’t allow your visitor to enter your WordPress website because that site is untrusted and insecure.

Explaining through an Analogy

Think of it this way – you own a house. There is a big fenced gate but you do not have a dog or any alarm to warn you in case if someone comes in uninvented. The ‘your connection is not private’ error because of using HTTP protocol works in the same way – it is an open invitation for the hackers to come in and take the information available on your server.

The visitors on your website can clearly see this message in their browser which tells them to refrain from entering any valuable information such as credit card information on your website which leads to the loss of business.

This simply shows that you should be concerned about ‘your connection is not private’ error if it is showing on your website. This begs the question of how you can fix ‘your connection is not private’ error on your WordPress website. We will try to answer this question in the next section.

Fixing the ‘Connection is not private’ error in WordPress website for Google Chrome

As explained above, using the HTTP protocol is one the reasons why such error occurs. When you opt for the HTTPS (Hypertext Transfer Protocol Secure) which is a more secure version of HTTP, it protects your WordPress website from security threats.  The HTTPS protocols use SSL (Secure Sockets Layer) certificate to create a secure connection between the server and the browser.

What is an SSL Certificate?

SSL certificate is a data file stored on web servers. It activates padlock functionality along with HTTPS protocols for secure connection from a web server to browser.

Why is it important for fixing ‘your connection is not private’ error?

When a visitor enters your website on a search engine- let’s say, Google- your search query will reach the server as a request that’s working as a host for that specific website. In halfway through, the browser jumps in to validate the SSL certificate stored on the site’s server for ensuring that a website is complying with privacy standards.

In case, if the validation of SSL certificate gets failed, there’s an inbuilt user-protection feature in Google Chrome browser, which works to keep your website visitor away from reaching the malicious website (your WordPress website). Consequently, it will send an error message saying “Your connection is not private”.

private1

Therefore, fixing this error becomes imperative from a business point of view as it can result in a loss of lead and revenue for your company.

Quick Fixes for ‘Your Connection is not private’ error

Here are some of our tried and tested fixes for you to fix this error:

1. Check your internet connection

Generally, public WiFi networks run over HTTP instead of HTTPS. You should bear in mind that making transactions through public WiFi is not secure at all. That’s why, you should change your connection from a public WiFi network to a private WiFi network and try again.

2. Check your computer’s clock (date and time)

Basically Google Chrome considers your computer or laptop date and time to verify the validity of the website’s SSL certificate. Therefore, you should set the date and time of your computer or laptop correctly to fix this issue.

3. Use incognito mode of your browser

With incognito mode, you browse search engines without keeping any browsing history, cache and cookies. You can use incognito mode easily, only you have to do is to click on three-dots in the top-right of Google Chrome Window and select ‘New Incognito’ window.

private2

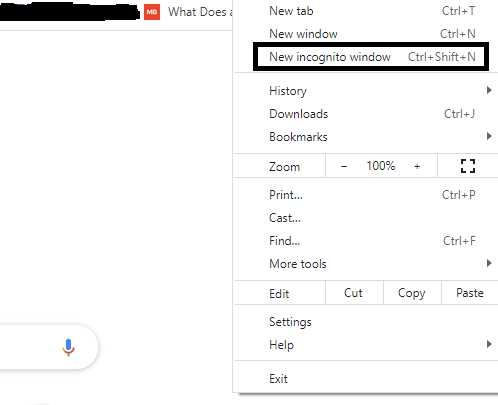
Now, access your website once again with the help of incognito mode.

private3

If it seems to work on incognito mode, then there is an issue with your browser cache and cookies and cleaning them will help you get rid of this security warning.

4. Force reload the page

Force reloading the page is another way to fix ‘your connection is not private’ error. Although it may seem less practical at first, but, in certain situations, it works well to solve the technical issues.

Just close your browser, re-open, and try to load the page again. Possibly, your browser had failed to connect with the website’s certificate but possibly it could now.

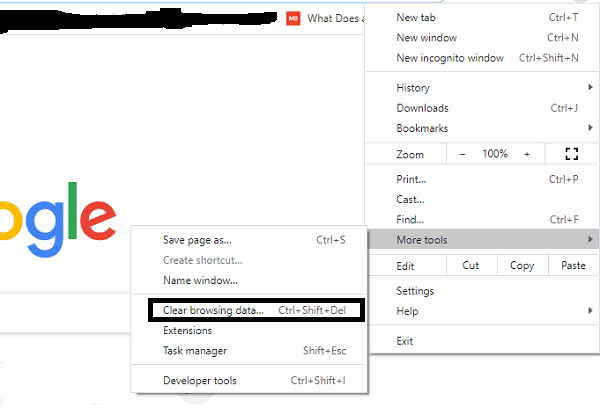
5. Clear browser cookies, cache and history

If you want to fix “Your connection is not private” error manually without investing much of your time, you should start clearing your cookies, cache and history on your Chrome browser. First of all, click the three-dots at the top right corner which will open a drop-down menu and click on More Tools and now click on ‘Clear browsing data’ and it will definitely fix ‘Your connection is not private’ error.

private4

6. Upgrade your OS (Operating System)

Upgrading your operating system (OS) is also an effective way to prevent hacking and getting your critical and confidential information from being stolen. When you update your OS, it wipes out all chances of your cyber security from being compromised as you can sync your computer with the latest security technologies for flawless protection.

Therefore, we would recommend you to upgrade your OS for fixing “your connection is not private” error as fast as possible.

7. Turn off antivirus and VPNs temporarily

Believe it or not — there are some antivirus programs that create this issue (Your connection is not private.). If you want to test it, go to your antivirus program, turn it off and test the website again to check whether you’re facing this issue again or not.

8. Restart your computer

Majority of the temporary caches escape ‘delete’ and hide in the computer and they keep multiplying until they outgrow in numbers and affect your system badly. Therefore, it is good to delete those temporary files and restart your computer to getting rid of this technical flaw.

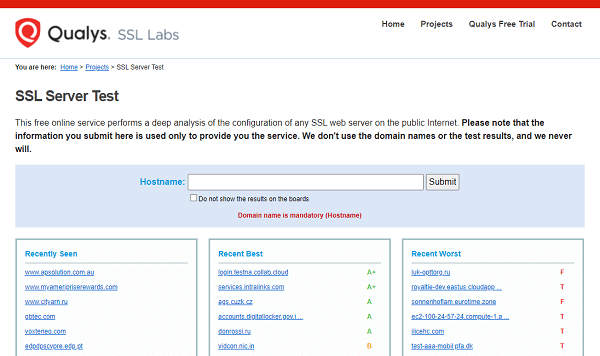
9. Diagnose your SSL server

You can always run the SSL server test which will check if the SSL/TLS certificates are properly installed. Because, if you won’t have these certificates installed properly, you’ll keep receiving warning signs and error messages in browsers. On the other hand, if you’ll have everything correctly installed in your website, you’ll be good-to-go.

We suggest you to use the free SSL Check tool to diagnose SSL server for reliability and usability. Type domain of a website into the hostname and click ‘Submit’. You can hide public results if you want to. Although, this scan might take a few minutes but it will show you every details of your site related to SSL/TLS configuration.

private5

10. Install and Activate SSL plugin

Although you’ve enabled your SSL certificate that is working well, you need to install and activate an SSL plugin on your website.

In essence, SSL plugins help you prevent problems i.e., ‘Mixed Content’ but they do work to promote the online protection of your site. Following is the process to install and activate SSL plugin:

  • Click on ‘Plugins’ on your WordPress Admin dashboard
  • Click on “Add New”
  • Go to “Search Plugin” in textbox and write “SSL Plugin” and you will see search results.
  • When you’ve selected your SSL plugin, click “Install Now”.
  • When you’ve completed the installation process, now click on “Activate” to start using the plugin.
private6

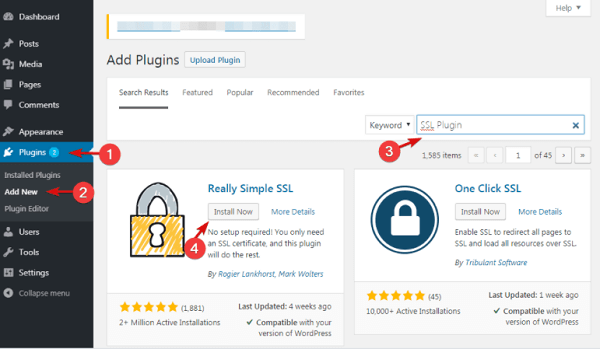
Once activation is done, this plugin will see if SSL certificate is enabled or NOT. If it is enabled, your website settings would use SSL/HTTPs and, hence, you can avoid ‘your connection is not private’ error message.

11. Fix DNS server

Fixing DNS servers is helpful in solving ‘your connection is not private’ error message. First thing first, change your DNS server. Generally, we use Google Public DNS (8.8.8.8) and (8.8.4.4) or Cloudflare’s DNS (1.1.1.1) and (1.0.0.1). Therefore, we recommend you to default back to your ISPs DNS server and possibly it will fix this issue for good.

The process of fixing DNS servers on Windows is to go to network connection properties and select ‘obtain DNS server address automatically’. However, don’t forget to remove Google’s public DNS or Cloudflare’s DNS from your router.

12. Resolve Mixed Content Issues

Although your website is already using SSL certificate, but, still a big quantity of content comes from non-HTTPS URLs. And, when it outgrows then browsers start to treat the whole website as ‘Highly Insecure’ for other netizens.

To fix this standard encryption issue, you will have to install and activate the Plugin on your site to fix mixed content issues. Following are the three best WordPress plugins for this purpose:

Final Words: Fix ‘Your Connection is not Private’ Error in Chrome

Certainly, we’re happy that you’ve come this far to learn ‘how to fix your connection is not private’ in Chrome and we hope that you’ve found the correct tips and tricks to fix this technical issue.

Typically, this error message happens due to certain reasons that we’ve tried to cover in plain simple language so that you can make most of the fixes described throughout this blog post.

Plus, if you’re busy or don’t want to fix ‘connection is not private’ error by yourself, then you can hire our experts at WP-Bridge where we offer various services to our clients ranging from uptime monitoring to full technical audit of your website to help you gauge the performance of your WordPress website.

WordPress Website Monitoring 24/7?

Let us manage your WordPress site with top-notch security and high-end technical features– all-in-one-place.

Recent Blog

img
Posted by

WordPress powers 14.7% of the world’s top-sites which makes 63.5% of the total market share. Only in 2020, 500+ sites were built on WordPress, and 60-80 sites on Shopify( a huge difference!). Plus, WordPress has over 59000 plugins – these stats show us how impactful and user-friendly WordPress is.

In this article, we’re going to discuss key reasons that make WordPress ‘The Most Popular CMS’.

What Reasons Make WordPress “The Most Successful CMS”?

Following are ten reasons that make WordPress “the most successful CMS”. Go through them and enlighten yourselves:

Reason # 1: Ease of Implementing SEO Practices

WordPress is the most SEO-friendly CMS. Pick a catchy domain, use a responsive WordPress theme and organize your content effectively and boom ! you are good-to-go; boost engagement and win your marketing goals. Yes, It is this simple – no rocket science is required.

Unlike custom sites, you don’t have to spend extra-buck in development of a site. Neither, you will have to wait any longer before your site is actually complete. Likewise, prior knowledge and skills are not indispensable to move the needle. With WordPress, you can establish yourself as a most trusted service provider, ecommerce site or a blogging site, you are just a few actions away from becoming the next Huffington post.

This is ‘why WordPress is So Popular CMS’ because you can implement SEO strategies easily.

Reason # 2: Content Management - It’s A Cinch At WordPress!

Everything, which delivers a value, a message and a meaning, is Content. Whether you want to upload a video, a text content, an infographic, or just an audio podcast; you’re using the power of content to launch your brand or service or just promoting your well-groomed online identity.

It is by far the handiest CMS to manage your content to optimize engagement and SEO endeavors. Content is King which enables you to rule the world of internet marketing. And, WordPress is the right CMS to ease up content management for maximum output and ROI.

WordPress is very popular from enterprises and bloggers to big companies because they can manage their content and can prioritize SEO for maximum effects.

Reason # 3: It is FREE (Yes! And You will Love it )

The best thing about WordPress is that “it is free” and you can easily install WordPress core software on your site. Though WordPress is FREE, but, you will have to pay money for themes and plugins. Long story short, WordPress is a search engine-friendly CMS where you can create top-notch websites with engaging content.

Irrespective of niche, industry, and types of services, WordPress is the sweet-spot where you can design and build responsive websites at low-cost to save money for other aspects of your business.

Reason # 4: There is a Plugin For Everything - Amazing, isn’t it?

WordPress plugin is a software that plugs into your WordPress site to expand existing functionalities or add new ones. Plugins can make small changes to massive enhancements as per your requirements.

Likewise, you can use plugins for the front-end of your site as well as the back-end of your site to carry out the variety of tasks i.e., for taking backups, for putting WordPress site on a maintenance mode, for search engine optimization (Yoast SEO), and for responsive video and photo galleries (Envira Gallery),etc.

WordPress is a powerhouse of 59000 free plugins to enable you to optimize your site visibility, expand its features, and secure it from potential threats and cyber-criminals. No other CMS is this much equipped with handy plugins. Following is the little list of content management systems with the total number of plugins:

Hence it proves, WordPress dominates the CMS market with its big collection of 59000 plugins. Well, do you agree?

Reason # 5: WordPress is Open-Source - For Everyone. AND . Anyone

WordPress is an open-source CMS. Its source code is accessible and modifiable so that you could add and expand functionalities of your website. So, if you own a WordPress site, you can easily adapt to changes to adjust in existing trends to keep your site responsive and fully-functional.

Since WordPress is open-source, this CMS has a big community of WordPress contributors who bring forth pragmatic and innovative ideas to help WordPress grow significantly. (That’s why, WordPress dominates CMS market by 60.8%, it powers more than 15% of world’s top sites, and 500+ sites are built just on WordPress everyday – jaw-dropping stats, isn’t it)

Reason # 6: Want to Become a Blogger? Make WordPress Your Next Home

Initially, when WordPress started off its journey, it was purely a blogging platform. Over the years, it has expanded its usability so that you can use this best CMS for all types of websites from business sites ,membership sites, educational websites to Ecommerce stores, etc.

So, if you are an aspiring blogger who wants to reach out to a massive audience, make WordPress Your Next Home. It is an easily manageable, open-source CMS with a massive community of developers and contributors who work persistently to add innovation to WordPress. Still confused? Well, look at the following pointers expressing usefulness of WordPress as a blogging platform:

It is SEO-Friendly. You can optimize your visibility as a blogger across the internet to boost subscribers and connect your target audience at the right time.

WordPress is full-of-plugins for bloggers. It has a plugin for everything. It has OptinMonster for conversion optimization. It has PushEngage for web push notification. It has an Uncanny Automator for creating workflows automatically. It has Pretty Links Pro for monetizing your WordPres site content. Finally, you can get plugins literally for anything.

You can manage your content perfectly. Strategically, content is inevitable to steer your online presence towards the right direction. Like we said earlier, content is anything of value with message and meanings (videos, texts, infographics or just an image). WordPress is,certainly, a launching pad for bloggers where they make most of all types of content for gaining traffic, targeting the right audience, and generating qualified leads.

This is our reason number six – if you want to become a blogger, use WordPress. And, we believe it is helpful – isn’t it?

Reasons # 7: WordPress is the Right CMS For Enterprises

Previously, we highlighted a reason why you should use WordPress if you want to embrace ‘blogging’ as a career choice. Right now, we are going to see WordPress as “the right CMS for enterprises”. One-size-fits-all is a metaphorically correct expression for a WordPress: A content management system where building an e-commerce empire or profile website is as easy as ABC.

Following are the clear-cut examples of a reason “Why WordPress is Right CMS for Enterprises”:

  • elearning portals: elearning will grow globally to more than $240 Billion by 2022, 90% of businesses offer elearning training to their employees, and online education is expected to be a $374 billion industry by 2026. So, if you want to build your own e-learning platform, WordPress with LMS hosting is the right choice for you. You should use LifterLMS – a plugin for creating and marketing online courses including multimedia lessons.
  • Enterprises can use WordPress for creating Invoicing systems manager for products and services with Sliced Invoices. It is basic and you can use it with ease. This is one of the best plugins available in WordPress plugin repository.
  • Event management systems: You can set up an entire online system for event management. There are various plugins for event management. We would vote WP Event Manager because it is lightweight and open-source.

Reason # 8: Freedom. AND. Control in WordPress

Technically, WordPress is open-source. Therefore, there’s no limitation of flexibility and scalability. Especially, for ecommerce functionalities, you’re in a straitjacket at closed-source CMS. Likewise, your content is not even yours (unfortunately!)

Whereas, with WordPress, you have full freedom and control. You can move redundant files, build your online stores, incorporate plugins, or add a safe-and-secure WordPress theme for your site, you will have freedom and control in WordPress.

Reason # 9: Full Support for Almost All Media Formats

WordPress can support an extensive list of all media formats. Here, we’re covering primary media types and formats:

  • .mp3, .mp4, .m4a, .mov, .wmv, and .avi (Video and audio)
  • .pdf, .doc, .pptx (Documents)
  • .jpeg, .png (Images)
  • In fact, WordPress has file support for less common file formats such as .3pg, .ogg, .key, and .odt,etc.

Reason # 10: Massive Community Support (You won’t find it elsewhere!)

Since WordPress is an open-source CMS; anyone can optimize the source to scale up WordPress software enhancements and ease of developing secure, feature-packed and high-end themes and plugins.

Therefore, WordPress has solid community support of professional theme creators, plugin developers, and web hosting service providers, and professional WordPress maintenance service providers like WP-Bridge – which you won’t find elsewhere.

And, everybody co-exists with ONE MISSION: To Make WordPress Easy for Everybody.

Conclusion: Why WordPress has Become So Popular | Top Ten Reasons

WordPress is the most popular CMS where you can do anything. Build a blog or just run an Ecommerce store; you can do anything. Well, here are ten reasons that make WordPress such a popular CMS across the globe.

In nutshell, WordPress isn’t just a content management system, it is a launching pad to turn your ideas-on-paper into moonshots. If you have a WordPress site but can’t fix glitches yourself, don’t worry, we offer WordPress maintenance service and enjoy.

Permalinks
Posted by

Permalinks – A means to Enhance the WordPress website Performance

URLs are something that actually connects business owners with the target audience. Having a right and easy URL such as Google.com or Target.com not only enables the audience to remember the business and its URL but also can easily access its main page/homepage. In the world of WordPress, these URLs are known as permalinks. WordPress.com defines permalinks as:

“Permalinks are permanent URLs (Uniform Resource Locators) assigned to individual blog posts, pages, category and tag archive”

Linguistically, permalink is a portmanteau of Permanent and Hyperlink. It’s a URL that allows people to reach out to different parts of your WordPress site.

The importance of URLs or Permalinks (as we will be using both interchangeably throughout this article), cannot be overlooked. But unfortunately, it is overlooked when WordPress websites are created. When WordPress websites are created, developers or even the owners do not pay a lot of attention while creating them because it is considered to be an unnecessary item. However, that is not the case. Permalinks are highly important when it comes to SEO and performance optimization of the WordPress website (will be discussing this in detail in the next sections).

A long, lengthy, or even a faulty permalink can affect the overall performance of the WordPress website and the SEO efforts. All-in-all, a well-defined permalink works as a clue for a search site and ensures that whether your content is search-friendly or not.

Therefore, in this article, we will be focusing on changing permalinks in order to make them optimized for the best WordPress performance.

But, first, as always, a little education on Permalinks is important!!

What does a Structure of WordPress Permalinks look like?

Basically, a permalink comes into two parts:

  1. First is the domain name of a website ( i.e., wp-bridge.com)
  2. Second is the slug: a URL-friendly name describing the content that user is going to find on the page (i.e., /contact-us)

Why are Permalinks So Important?

Permalinks have significant importance for WordPress sites as they have a direct impact on things such as SEO, user experience, and website navigation, etc. Some of these aspects are discussed below:

  • User Experience: One of the things which makes the user experience of a website better is ‘URL’. Often, UX design is considered essential for all the stuff lying below the browser tabs, but holistically, the full user experience is not limited just to it. Technically, what you’ve included or have not included in your permalinks mark a big impact on whether a visitor can land on the correct page or will bounce back. For example, users look at the title and URLs of the site. So, they only pick those URLs which seem relevant. That’s why permalinks boost the UX of a WordPress site.
  • Effect on SEO: “No visibility is no business” – No brand can successfully exist in today’s super-digitalized business ecosystem without an identifiable presence across search engines. And, this online visibility is bound to happen when you have a good SEO strategy in which ‘permalinks’ play an important role. In broader context, a SEO builds domain authority through the use of right keywords, and if those keywords are integrated objectively in permalinks, they are a surefire solution to boost your SEO rankings to pull search engine traffic to your WordPress site.
  • Website Navigation: Permalinks enhance website navigation as they help users figure out the location of a content on the website. Permalinks make it easy for netizens to return back to their favorite post later and they can share the post with everyone else. Contextually, URLs help identify and organize content. It is the responsibility of the front-end to create user-friendly permalinks so that a visitor could get an idea of website structure for finding relevant content on your WordPress site.

When should you Reset or Change Permalinks?

From a technical standpoint, changing WordPress permalinks can badly affect SEO endeavors as it might impair link building efforts used for funnel-building to drive web traffic to your WordPress site that kills off lead-generation efforts. There are a few things you need to do to resolve these issues even after resetting permalinks in WordPress.

Here are some of the instances, when changing permalinks can prove useful:

  1. Possibly your existing posts have a page structure that’s not user-friendly. For instance, the old version of your WordPress post contains a Post ID which is not helpful for people to remember and they can’t use for reference for later use.
  2. An existing post consists of a worthless permalink structure with no SEO benefit.
  3. When you’ve rebranded your site and want your URLs to showcase your rebranding efforts.

What are the Easy and Safe Steps to Change WordPress Permalinks Without Breaking the Site?

To change permalinks in WordPress without breaking the site is not without difficulty. In order to change the permalinks without breaking the WordPress website, you should take the following easy and safe steps for changing WordPress permalinks correctly:

1. Backup your WordPress website

In order to change the permalinks, first take a backup of the page or if you have time – the whole website so that in case if a link does not work, you can revert back to original settings.

2. Change your permalinks

In order to change the multiple permalinks of your contents, just go to the WordPress dashboard where you can update the permalink structure. This action should produce two outputs:

  • It should change the permalinks of already existing pages and posts in WordPress.
  • It should change the custom URL structure to ease up storing content in future with relevant permalink format.

3. Redirect the website

Once you change the permalinks, users will see a WordPress 404 error. Therefore, in order to prevent users from bouncing off your site due to unavailability of content, set up redirects. Specifically, use HTTP 301.

Moreover, old indexed posts with old URLs get broken when permalinks are changed. Therefore, everybody with an old link would see – HTTP 404 Page Not Found – an error message, that’s very irritating.

Here, you can do two following things to redirect:

  • Add the redirects manually to your WordPress site’s .htaccess file by using the following format for quick and easy redirection:
				
					Redirect 301 /your-former-post-url.html /your-new-post-url.html
				
			
  • Get a WordPress maintenance service from experts who will not only enable redirection to the file but also help you in the quick-fixes of other technical problems.

Final Words - Easy Ways of Changing Permalinks in WordPress in 2022 (without breaking up your site)

Permalinks are indispensable for WordPress sites due to a variety of factors that we’ve talked about comprehensively here – and we helped you understand how changing permalinks can harm your WordPress site as this process is fraught with peril. Even a slight mistake can damage the whole site leaving you agitated.

Or, you can have experts at WP-Bridge to handle everything for your website and make your site optimized and well-structured.

WordPress
Posted by

It’s a laborious task to create, manage and maintain a website but it can be made easy – from managing to maintenance – if you know your way around the hosting account control panel. Given the increase in usage of WordPress as a website builder platform, cPanel in WordPress has become quite popular.

Since cPanel is a popular web hosting control dashboard, certainly, there is an option of using it. It is user-friendly, intuitive and comes with all nuts and bolts for configuring your WordPress site.

In this article, you will walk through 7 effective and helpful tips to enable you to install, access and configure your WordPress site easily.

What are the Seven cPanel for WordPress Tips?

Following are the seven best cPanel for WordPress tips covering everything from installation and access to configuring. They are well-explained and highly useful to make it easy for you to use cPanel for WordPress:

Tip #1: How to Access your cPanel Dashboard?

Before we dive into details, let’s learn how to find your WordPress cPanel login screen. This process depends upon your hosting service provider.

First, log into your hosting account and check for a link or button saying you to ‘log in to cPanel’:

dashboard

Once you click the button, you’ll land on the cPanel dashboard now.

If you do not see this option, then open your preferred browser, enter your domain name followed by 2083 (for example, https:// example.com:2083) and it will show you cPanel login page:

cpanel

At this step, ask for cPanel credentials from your hosting provider and login.

Key Thing to Remember: You should have an SSL certificate installed on your WordPress site to access cPanel in this way.

Now that you have access to your cPanel account, it is time to get on the next step.

Tip # 2: What is the right way to Install WordPress in cPanel?

WordPress users can install Content Management System (CMS) without needing to upload files manually – a very useful feature for WordPress users.

To begin with, you need to log into your cPanel dashboard. Once you have access, browse the Apps section and select ‘Softaculous Apps Installer’. In this step, you’ll see a screen full of apps, from the list of available apps, select ‘WordPress’ right away:

dashboard

Right on the next screen, click on ‘Install’ and then pick a ‘one-click’ or custom option. Here, you’ll have to select a domain for installation of WordPress. We will use ‘subdomain’ for this purpose.

You will see Softaculous (App Installer) showing the WordPress admin and password automatically at the bottom of the screen. Now, enter your email address in the email installation details.

Now, the installer will begin loading. It might take a little time to finish off the process. Upon completion, you will see the screen provided below:

dashboard

The message comes with login information with a link to the WordPress login page. You will get all details sent to the provided email address.

How to Install WordPress in cPanel Manually?

Unfortunately, if you don’t have a one-click WordPress installation option provided by your hosting provider, you can install it yourself manually via cPanel which will take hardly five minutes to install, saving you from the extra tediousness of connecting your server via an FTP client remotely.

The first step here is to create a WordPress database. Log into your cPanel account to do so and click on MySQL Database Wizard under the database section:

dashboard

Enter the name of your new database and click on the Next Step button. In the screen showing ‘Create Database Users’,put a username and password, and click on ‘Create User’:

dashboard

At this point, you’ll be asked to assign privileges to the database. For this, click on Next Step > Return Home. In case, if you haven’t already, you should navigate to the WordPress site and download the latest version.

Now, return to cPanel, navigate to File Manager present under the Files section:

dashboard

When you’ve launched the File Manager, look for the public_html directory. Now, click on the Upload button and start uploading the WordPress.zip file:

dashboard

Click on the ‘Go back’ button once loading is over. Here, select the WordPress files along with Extract.

After the files have moved to the public_html directory, visit your domain in the browser. A WordPress welcome message appears, following the installation prompts to begin setting up your WordPress site.

Tip # 3: What is the Way to Access your WordPress Admin Dashboard from cPanel?

After finishing WordPress installation, you can access your admin dashboard from cPanel. A quick and easy way to do this is to click on the link that was sent to your email when you installed the CMS. Also, don’t forget to click on the administration URL link provided in cPanel.

Right after clicking on the link, you’ll be redirected to the setup page. Here, you will see guidance for new users:

dashboard

Tip # 4: How can You Use the cPanel File Manager?

File manager is a handy feature in cPanel. From accessing your WordPress sites’ files for critical editing to resolving technical glitches, you can do anything comfortably. Following are a few examples:

  1. When you have to create a child theme, or when you have to implement WordPress multisite.
  2. You can troubleshoot errors preventing you from accessing WordPress dashboard
  3. Upload or remove themes and plugins manually
  4. When you have to incorporate custom code or have to turn on debug mode.

File manager interface has a user-friendly interface where you don’t need an extra set of login credentials. Take a look at the image below telling you how to access the cPanel file manager – Files > File Manager:

dashboard

It will take you to a list of all files uploaded to your server through a hosting account. For accessing your WordPress files, search for public_html folder:

dashboard

You can upload, delete, edit and download your website files for creating backup, managing file permissions and using more options:

dashboard

Tip # 5: Open phpMyAdmin from cPanel

A WordPress site also contains a database in addition to WordPress files. A WordPress website owner can edit information stores in the database to solve errors, add/remove user(s) from a WordPress site, or even enable you to reset lost WordPress password.

Here, you’ll have to go phpMyAdmin: a database management tool used to communicate data from your site and successfully finish any of the tasks. A way to access comes via cPanel by Databases > phpMyAdmin

cpanel

When you’ve opened phpMyAdmin, find your database in the list on the left side and view its tables by expanding it:

cpanel

You should be able to apply relevant instructions to solve errors or you may edit the changes.

Tip # 6: Change your WordPress Password from cPanel

In case, if you have lost your WordPress password, you can use phpMyAdmin from cPanel to change your WordPress password. To do this, access phpMyAdmin from cPanel, go to the database of a website, edit the users. Now, in a few more clicks, you can comfortably reset the encrypted passwords for users.

Tip # 7: What is the correct way to uninstall WordPress from cPanel?

Let’s say, you want to launch a new website or want to get rid of WordPress installation, you can do anything via cPanel easily and in a record time. Well, before doing anything, you’ll have to build a backup first for future use. After you’ve made a backup of your WordPress site, log in to your cPanel account in the next step. At this stage, open your File Manager and look into the public_html directory where you could select and delete WordPress files.

Now comes the time to delete your database. For doing this, click on MySQL Databases under the Databases section of cPanel dashboard. And, finally, select and delete the WordPress database. WordPress no longer exists.

Final Words - 7 Effective Tips for cPanel for WordPress

Mo website owner can deny the fact, ‘a web hosting control panel by a hosting provider has to play a crucial role in managing a WordPress site. Therefore, it is super-important to be familiar with how to use cPanel for WordPress. That’s why, we talked about cPanel and its uses at length throughout the article.

If you feel this is too confusing or complicated, just reach out to us at WP-Bridge, and our experts will take care of everything.

Tired of a Slow Loading Website? Want to Make WordPress website Load Faster?

WP Bridge uses cookies and similar technologies as strictly necessary to make our site work. We and our partners would also like to set additional cookies to analyze your use of our site, to personalize and enhance your visit to our site and to show you more relevant content and advertising. For more information, please read our Privacy Statement.

Website Audit Form

We’re looking forward to providing ongoing support for your website! Please fill out the form below for website audit report.
This is the website URL for your monthly maintenance package.