
Technical errors in WordPress website
Started in 2007, WordPress as a CMS (Content Management System) has achieved incremental success in the past 17 years. It has improved a lot after going through multiple trial-and-error phases. As a WordPress Website Maintenance Company, we have seen a fair share of these errors hampering the performance of our clients’ websites on a frequent basis. Some of these common technical errors that happen with WordPress websites include:
- 503 Service Unavailable error
- 413 request entity too large error
- WordPress keeps logging out
- 502 bad gateway error
Although these errors are not entirely WordPress’s fault as it includes Internet and server issues as well, there is however, a more common technical error related to WordPress and Internet than those mentioned above. It is the “DNS – dns_probe_finished_nxdomain” error that you will keep seeing commonly on many platforms such as Google Chrome and on operating systems such as Android, Mac, and Windows. (you can find more information on what is this error is by clicking here)
Since we have already covered the topic on “how to fix dns_probe_finished_nxdomain problem in Google Chrome and Android” in our last post, we will be focusing on “how to fix dns_probe_finished_nxdomain problem in Mac and Windows” in this article.
So let’s start by discussing the problem and its fix in Windows.
How can you Fix dns_probe_finished_nxdomain error in Windows 10?
When it comes to Windows 10, there are 5 effective ways that you can use to get rid of dns_probe_finished_nxdomain error effectively. These are:
- Restarting the DNS Client Service
- Releasing and Renewing IP address
- Changing the DNS Server
- Flushing the DNS Cache
- Checking your Local ‘Hosts’ file
We will be checking each one out below in detail.
1. Restarting the DNS Client Service
DNS client services work to resolve domain names and cache. That’s why, when you restart DNS client services in Windows 10 chances are you’ll be able to fix dns_probe_finished_nxdomain error. This process is very easy.
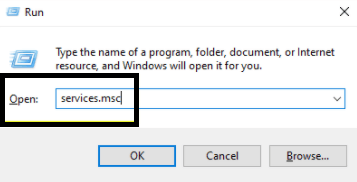
- Go to start menu, press R and write “services.msc”, and press ‘OK’ button:
- At this stage, locate your DNS client, right-click on it and press ‘Restart’ to clear out the cache and get the DNS working again.
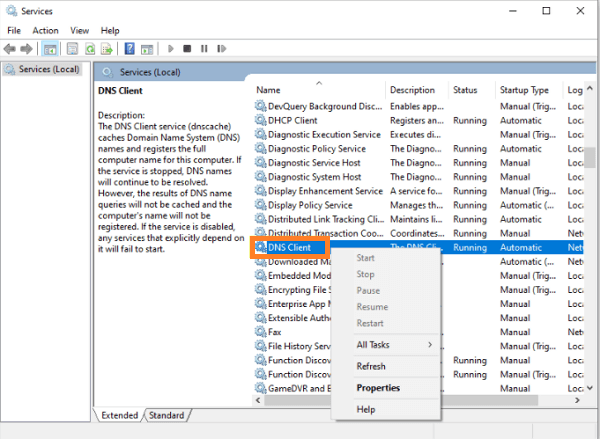
However, there is a chance that you will find yourself staring at a disabled restart option like you can see in the above screenshot. There is no need to worry in such an instance. There is a second option that you can use to solve DNS problems.
Simply, Press Windows logo key + R that will open command prompt “cms” and enter:
- net stop dnscache
- net start dnscache
Hit Enter after each command after ensuring your act is in the right direction.
These two options are really the easiest but if you still think that the problem is still there, you can check out the following fixes or contact a WordPress Website Maintenance company to help you solve the issue.
2. Releasing and Renewing IP address
In Windows, releasing and renewing an IP address is a mission-critical method. The method that we will discuss to resolve dns_probe_finished_nxdomain in Windows is a bit technical, so try to follow each step precisely.
In this method, you’ll have to open the command prompt app and enter the following commands. Keep in mind, that you will have to hit Enter after each action:
- ipconfig/release (enter)
- ipconfig/all (enter)
- ipconfig/renew (enter)
- netsh int ip set dns (enter)
- netsh winsock reset (enter)
While releasing and renewing your IP address, you have to reset Winsock on your Windows laptop/PC because it looks after Internet app requests. Once you’ve done all of these commands restart your computer to fix the dns_probe_finished_nxdomian in Windows.
3. Changing the DNS Server
To change the DNS server in Windows all the way to Google Public DNS follow the steps mentioned below:
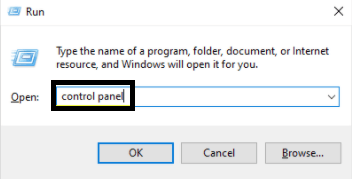
Hold down the Windows logo key + R to open the ‘RUN’ panel. Type “control panel”, and press OK button:
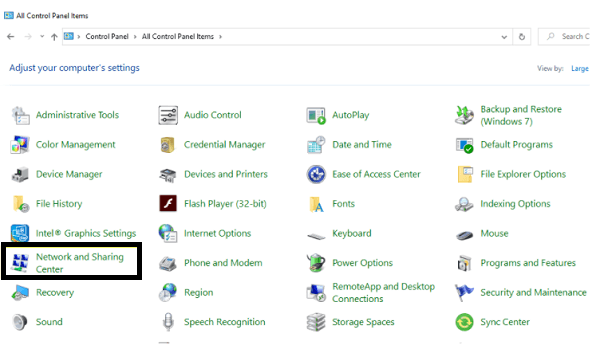
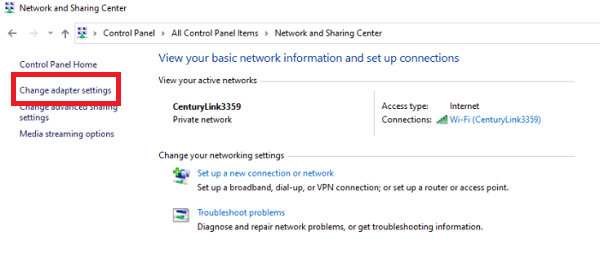
Navigate to Network and Sharing Center from the control panel window as shown in the screen below.
Select Change adapter settings, on the left-side of your screen:
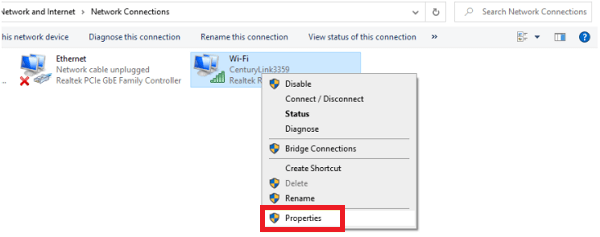
In this step, you’ll have to right-click on the connection that is in use at the moment, and select Properties:
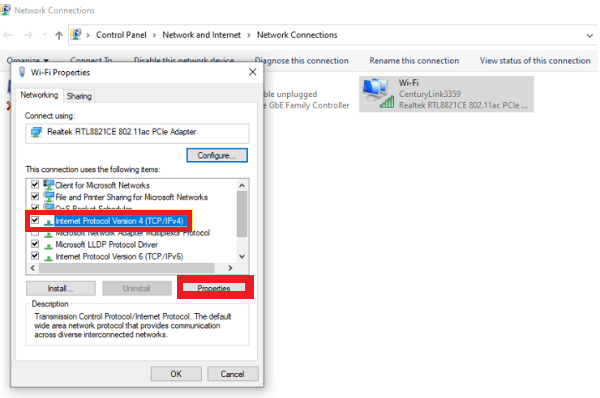
Browse and select TCP/IPv4 (as it is visible in the image below), and press Properties button:
After clicking on ‘Properties’ in previous step; now, you will select the the option (Use the following DNS server addresses) under the ‘General Tab’
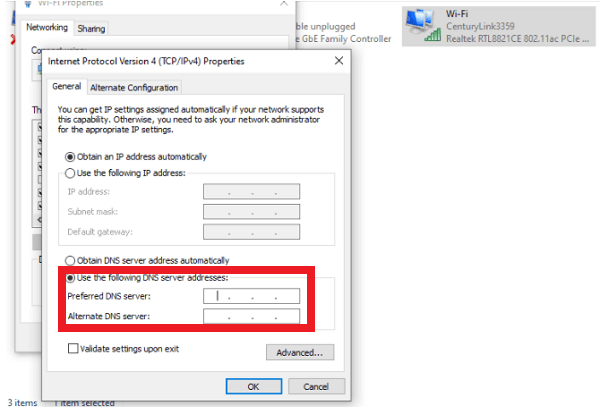
Once, this screen pops up (that one which is given above), then enter the following values:
Preferred DNS server: 8.8.8.8
Alternative DNS server: 8.8.4.4
Finally, hit ‘OK’ and now restart your browser and check whether the dns_probe_finished_nxdomain error has been fixed or not. If it is not, then we recommend contacting a WordPress Website Maintenance Company to help you solve the problem as we do not want anything wrong further.
4. Flushing the DNS Cache
In this method, press the Windows logo key and type ‘cmd’ in the start menu. It will open the command prompt app, as you can see in the image below:
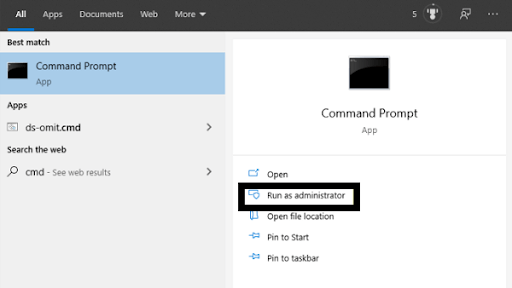
Once, you’ve pressed ‘Run as Administrator’, it will ask you to allow an app to make changes to your device. Feel free to select the ‘Yes’ button. Enter the following command in Command Prompt window:
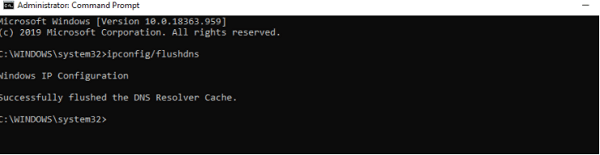
ipconfig/flushdns
Now, click ‘Enter’ after completing the process, after which you should get a message on your screen telling that the DNS cache has been successfully flushed as below:
Finally, it’s time to restart your browser and visit that website again which showed dns_probe_finished_nxdomain before.
5. Checking your Local ‘Hosts’ file
An easiest way to fix dns_probe_finished_nxdomain error when every method seems to fail is checking your local ‘hosts’ file.
Click on the Window logo key and type the name of the text editor (which you use most of the time). You can choose to open ‘Notepad’ as we have used that. Now enter Run as administrator.

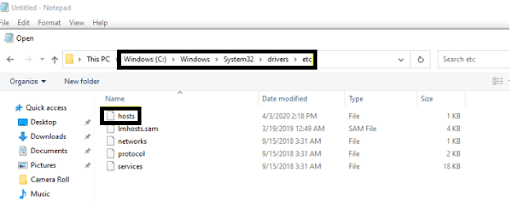
Once, you’ve reached run ‘Notepad’ as an administrator, now, select File>, and now navigate the following:
C:\\Windows\System32\drivers\etc\
Now, you’ll have to select and then open the ‘host’s file:
In this final step, check to make sure the domain of the site you want to access isn’t within the file.
The 5 methods used above to fix the dns_probe_finished_nxdomain in Windows is not an exhaustive list.There are more methods which are complicated than the ones explained above which will require technical assistance unless you want something going wrong with your website while trying to fix one issue. Rest assured, you can always count on US to be there as your technical angels.
In the next section, we will look at fixing dns_probe_finished_nxdomain in Mac as this is the second most common operating system used by millions around the world.
How to fix dns_probe_finished_nxdomain in Mac?
Did you know that most of the common errors of dns_probe_finished_nxdomain errors in Mac are similar to Windows? Interesting right? Based on this some of the fixes are also same but functions for fixing them are a bit different because of the operating system.
Below is the list of fixes that we will use to fix dns_probe_finished_nxdomain errors in Mac.
- Flushing the DNS cache
- Checking the local ‘Hosts’ file
- Releasing and renewing IP
- Changing the DNS Server
1. Flushing the DNS cache
Unlike Windows 10, where you do everything in the Command Prompt app, in Mac, you’ll have to use a terminal application. You will find this app in Applications > Utilities folder.

When you’ve double-clicked on the Terminal apps in order to open it, just enter the following command and hit Return:
dscacheutil-flushcache
At this stage, just restart your browser and visit the website you want to access.
Important Note: Unlike Windows, it doesn’t show a message saying ‘Successfully flushed the DNS Resolver Cache’ so do not worry about it.
2. Checking the local ‘Hosts’ file
For locating ‘hosts’ file on Mac OS, you’ll have to use Terminal app (inside Utilities folder) as shown in the above fix, and then, enter the following command and click Return:
sudo nano /private/etc/hosts
At this moment, when you’re checking local hosts file, you would be asked to enter the administrator password. After entering the password which will gain you the administrator rights, the ‘hosts’ file will open. In this file look for the website domain that you wish to access. Once you locate the website domain name, delete the line from the file right away.
Don’t forget to save the file when you’re exiting from the terminal app. This should help fix the dns_probe_finished_nxdomian error. You can test it by refreshing your browser and accessing the website again.
3. Releasing and renewing IP
This method is used only if flushing the DNS cache does not work and you are still looking at the DNS error. This method is related to ‘releasing and renewing IP’ addresses.
To do this on a Mac computer, you will have to open terminal app – it is like a command prompt of Windows 10 – and, then enter the following command
sudo killall –HUP mDNSResponder
Now, press the Return key and hopefully you will not see dns error again.
If the problem persists, then you will need a more qualified technical assistance to help you solve the problem.
4. Changing the DNS Server
As in Windows, you can change the DNS server in Mac OS by switching the default DNS server temporarily to public DNS i.e., Google from your ISP.
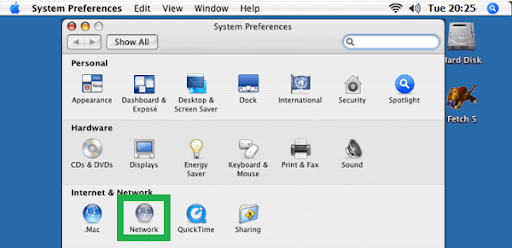
On macOS, click on the Apple logo icon present in the top left of your screen as shown in the screen below: System Preferences>Network
Select the network connection you are using at the moment. Hit the ‘Advanced’ button. And type ‘8.8.8.8’ and ‘8.8.4.4.’ respectively in DNS servers tab,
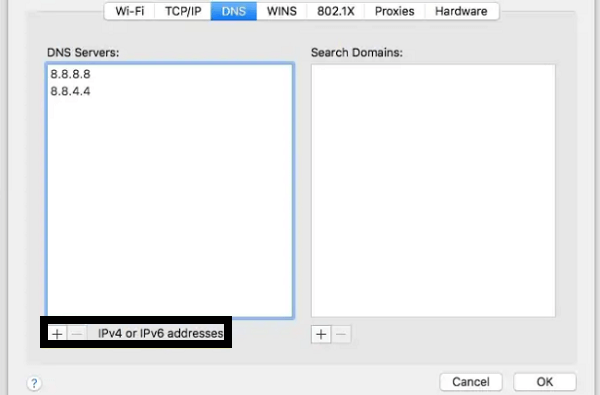
Select OK and restart your browser. This will also help in fixing the DNS error.
One Final Say in How to Fix dns_probe_finished_nxdomain
In this blog, we talked about how to fix dns_probe_finished_nxdomian errors successfully in two operating systems i.e. Windows 10 and macOS. As you’ve already read above, all of these methods are similar to each other for resolving dns probe issues.
For example, the process of flushing the DNS cache in Windows resembles flushing the DNS cache in macOS except for a small difference; in Windows 10 – we use command prompt, and in macOS, we use terminals.
We have tried to simplify fixing the errors for you to do it yourself. But sometimes, the problem goes beyond fixing the dns_probe_finished_nxdomain error. If you feel that this is the case, then we at WP-Bridge are at your service to help you fix the problem. Just contact us immediately, and our specialist will take care of you and your WordPress website immediately.
Happy fixing!!