
Is Your WordPress Website Slow?
It has become imperative more than ever to have flawless UX (User Experience) for timely optimization of your WordPress website on search engines such as Google. And, if you will fail to implement it, you’re going to hurt your business adversely. How?
Think about it from the perspective of a user:
- A user types your website in a search engine.
- The website should load in a few seconds but takes time.
- The user thinks something is wrong.
- Moves on to a competitor’s website.
- Business lost.
(Take it from someone who expertly deals with such issues on a daily basis.)
User experience does not only mean how your WordPress website looks, but it also means how fast a user can access your business website. This is known as page load speed. This is the first step in analyzing your WordPress website from the performance and optimization point of view. Keeping this in view, it is inevitable for you to give special attention to site speed and performance.
Now the biggest question comes in!! How to deal with this? No one likes to lose business especially online when you know you have many competitors.
The answer to this question is not one, but many. To improve your WordPress website’s page load speed from a UX perspective, one of the techniques that we use successfully is ‘enabling GZIP compression.’
It sounds technical because it is technical. Now, not to get worried because even though it is technical, you will be able to do it yourself once you go through our article. But first, a bit of education on the topic is necessary, if you are a non-technical person. If not, just skip right to the implementation part of it.
What is GZIP Compression?
Created by Jean-loup Gailly and Mark Adler, GZIP is not just a file format but also a software application that works to compress and decompress files in a website. Simple enough right? But, there is more to it.
As with all software, GZIP does come with its own set of pros and cons. For example, it can compress MPEGs well but can disappoint you on MP3s where it can increase size of the image instead of compressing it.
Even with this, GZIP compression is still important for you if you are looking to enhance your WordPress website page load speed.
Why? Continue reading!!
Why is GZIP Compression Important for You?
Just recall the scenario mentioned in the beginning of this article. Continuing from there, slow websites are not only tedious but also makes your site visitors tired and doubles bounce rate. In other words, it hurts your business conversion rate.
The argument here won’t be wrong that many tools can help you diagnose difficulties with page loading speed such as Google Pagespeed Insights and GTmetrix. But what these tools do not do is compress files which, if your WordPress website is using Javascript, can consume a lot of space on your server. This makes your website’s page load slow.
With GZIP compression, you can reduce your bounce rate and improve your conversions which ultimately can increase your reputation as an audience-centric website. Moreover, on the cost side, it is light on the pocket.
That is a good enough reason in my book to go for it!!
But, before delving into the enabling process of it, don’t you want to know if your WordPress website has GZIP compression enabled or not?
How to find out if my WordPress website has GZIP compression enabled?
By default, when you must have built your WordPress website, the developers might have enabled it as part of the account setup process. We do it as part of our standard process but sometimes others don’t.
We want to share an important thing here: When you get web hosting services from companies i.e., GoDaddy, etc, you will get GZIP compression enabled already in your hosting package because it is actually something that has to be enabled on your server-side instead of in your WordPress website. In case, if you haven’t got GZIP compression enabled, then you will have to do WordPress GZIP compression by yourself or get the help of some WordPress website maintenance company to do it for you.
In either case, you can easily verify either you’ve GZIP compression enabled or not using any of the two easy ways:
- Through the use of online checker
- Through web browser
Let’s start with the first one.
1. Through the use of online checker
In our experience, it is the quickest way to find out whether your website has GZIP compression enabled. Here, you will have to use an online tool called Base64.Guru’s.
Copy and paste the URL of your website in the search bar of this online test.
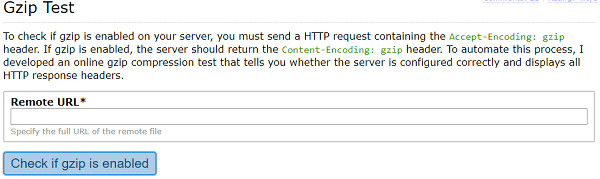
Now, after copying and pasting your website’s URL in Base64.Guru, you’ll get two results:
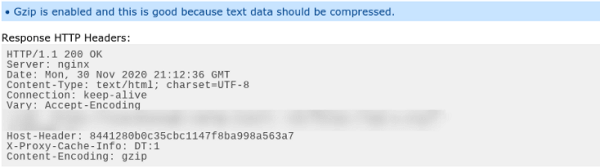
- It will show you that your website is GZIP-enabled along with a total number of space that was saved as a result of compression.(Check the image below).
- Or it will inform you that your website is not GZIP-enabled.
If you are not sure about this method, try the second one.
2. Through Web Browser
The second method you can use is to check through a web browser if GZIP is enabled in your website.
For this, we are using Google Chrome.
A. Go to chrome and open your website in a browser.
B. Right-click on your page, and select ‘Inspect’ to open the developer tools.
C. Then, you will have to navigate to Network and right click on the page name, select the headers tab, and come down to the Response Headers section (see below).
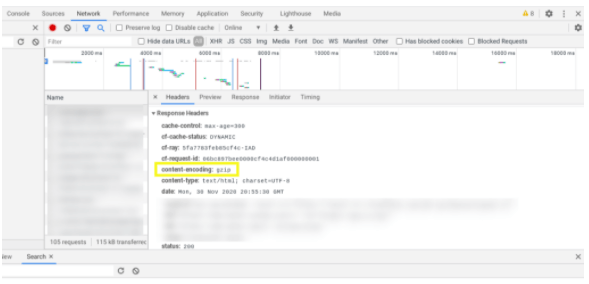
Here, you can see if GZIP compression is enabled or not in your website.
Now that you know whether your WordPress website has GZIP compression enabled or not – you have two choices:
- First, you can either scroll down to the end of this article and let us know if you enjoyed it.
- Second, move on to the next part of this article where we educate you on how to enable GZIP compression.
What are the Effective Methods to Enable GZIP Compression? - Solutions
If you are reading this part, then you know that you have to get your hands dirty. There are three methods which we will discuss here that you can use to enable GZIP compression in your WordPress website. Just pick the one that works best for you and you will have GZIP compression enabled in your WordPress website in no time.
1. Hosting Service Provider
As mentioned already, web hosting service providers enable Gzip compression in WordPress websites by default as part of their hosting packages. They come up with their own instructions-set helping you enable WordPress GZIP compression.
So, don’t shy away from reaching out to the customer support team of your hosting service and avail the GZIP compression service (if they have any) to improve the loading speed of your website.
2. Using Plugins
WordPress as a comprehensive CMS (Content Management System) has many advantages, and use of ‘Plugins’ is one of them. You can use plugins here to enable GZIP compression in your WordPress website. Here, I’m going to discuss three highly effective plugins to help you enable GZIP compression in your website with ease:
- WP Super Cache
- WP Rocket
- W3 Total Cache

The first WordPress plugin that can help you enable GZIP compression is WP Super Cache. It is a WordPress caching plugin with lots of options to compress code for fast loading of websites. Plus point is that you can download and use it for free.
Firstly, install this WordPress plugin then activate it. Once done, go to WP Super Cache>Advanced in your dashboard, and then tick the box saying ‘Compress pages’ so that loading speed of a website could be enhanced.
WP Rocket is a premium plugin with lots of extra features to help you enable GZIP compression. It is super-fast to help you make your website speedier in a few clicks. When you’ve activated WP Rocket, just add the .htaccess file with the help of mod_deflate module to start GZIP compression. Its starting plan is $49 for 1-Site license.
W3 Total Cache is a One-Stop solution. This WordPress caching plugin can help you in GZIP compression with more features on compression and other page loading speeding tools.
FAIR WARNING: It’s important that you must be careful when compressing your website because a little mistake can lead to trouble such as your website could break out in case of misconfiguration. If you are unsure about installing and activating plugins, then consult an expert.
3. Editing your Website Manually
The last method to enable Gzip compression is by editing your website manually. This method is mostly used by WordPress experts, so do it only if you know the INs and OUTs of editing your WordPress website manually.
In simple words, in this step you have to edit your .htaccess file and then you can compress your website for better loading speed. Make sure that the .htaccess file is in the root folder of your website. The quick way to access this file is by File Transfer Protocol (FTP) client. When you’ve located this file, you can either edit it directly on your computer or download it before you start making changes in your website.
Next, after locating and opening .htaccess, now add the following code #BEGIN WordPress and #END WordPress tags:
					# Compress HTML, CSS, JavaScript, Text, XML and fonts
AddOutputFilterByType DEFLATE application/javascript
AddOutputFilterByType DEFLATE application/rss+xml
AddOutputFilterByType DEFLATE application/vnd.ms-fontobject
AddOutputFilterByType DEFLATE application/x-font
AddOutputFilterByType DEFLATE application/x-font-opentype
AddOutputFilterByType DEFLATE application/x-font-otf
AddOutputFilterByType DEFLATE application/x-font-truetype
AddOutputFilterByType DEFLATE application/x-font-ttf
AddOutputFilterByType DEFLATE application/x-javascript
AddOutputFilterByType DEFLATE application/xhtml+xml
AddOutputFilterByType DEFLATE application/xml
AddOutputFilterByType DEFLATE font/opentype
AddOutputFilterByType DEFLATE font/otf
AddOutputFilterByType DEFLATE font/ttf
AddOutputFilterByType DEFLATE image/svg+xml
AddOutputFilterByType DEFLATE image/x-icon
AddOutputFilterByType DEFLATE text/css
AddOutputFilterByType DEFLATE text/html
AddOutputFilterByType DEFLATE text/javascript
AddOutputFilterByType DEFLATE text/plain
AddOutputFilterByType DEFLATE text/xml
					# Remove browser bugs (only needed for really old browsers)
BrowserMatch ^Mozilla/4 gzip-only-text/html
BrowserMatch ^Mozilla/4.0[678] no-gzip
BrowserMatch bMSIE !no-gzip !gzip-only-text/html
Header append Vary User-Agent
Now, save the file and upload it to your website’s server. When you’re done, use the GZIP compression checker tool to ensure that you’ve been successful in compressing your website.
There you go!! The easiest ways we can tell you on ‘how you can enable GZIP compression in your WordPress website’.
How to Enable GZIP Compression in NGINX
Consider this part as bonus information.
Since the majority of the shared hosting plans make use of Apache web servers or NGINX, we thought of adding this part as well as the process to enable Gzip compression in your WordPress website is a bit different.
Let’s say you are using NGINX. In order to enable GZIP compression in WordPress, you will have to open nginx.conf file and add the following code:
					gzip on;
gzip_disable "MSIE [1-6].(?!.*SV1)";
gzip_vary on;
gzip_types text/plain text/css text/javascript image/svg+xml image/x-icon application/javascript application/x-javascript;
What have we Learnt!
Although there are many ways to enhance WordPress website speed and improve UX, GZIP compression is the handiest and quickest thing you can do to your website. Hosting service providers enable GZIP compression automatically. But unfortunately, if you didn’t find GZIP compression active in your website, you can opt for a few things that we discussed in detail throughout this blog post.
Mainly, we brought three key methods into limelight to help you enable GZIP compression, and these are:
- Install a WordPress plugin (WP Rocket, WP Super Cache, W3 Total Cache) to enable GZIP compression.
- Reach out to the customer support team of your hosting service provider to enable compression, if you’re not expert enough in coding.
- Edit .htaccess file in your website manually to include snippets of code (you should do it if you know how to code).
Of course, these techniques will be helpful but if you want an expert to help you in optimizing your website speed, reach out to us at WP-Bridge. We are just a click away from you and let us handle your website while you focus on increasing your business.